Canva is one of the most widely used design tools. In this blog post, I’ll share 45 canva tips and tricks to help you maximize Canva’s graphic design capabilities, along with guidance on designing effectively with Canva. If you’re eager to create stunning graphics without dealing with technical complexities, exploring Canva Pro is highly recommended
Tip 1: Blur Image Backgrounds
With Canva Pro, blurring the background of any image is quick and easy.
Step 1: Import a photo onto your Canva design.
Duplicate the image by clicking the “Duplicate Page” button to create a copy, then paste it onto a new Canva page.
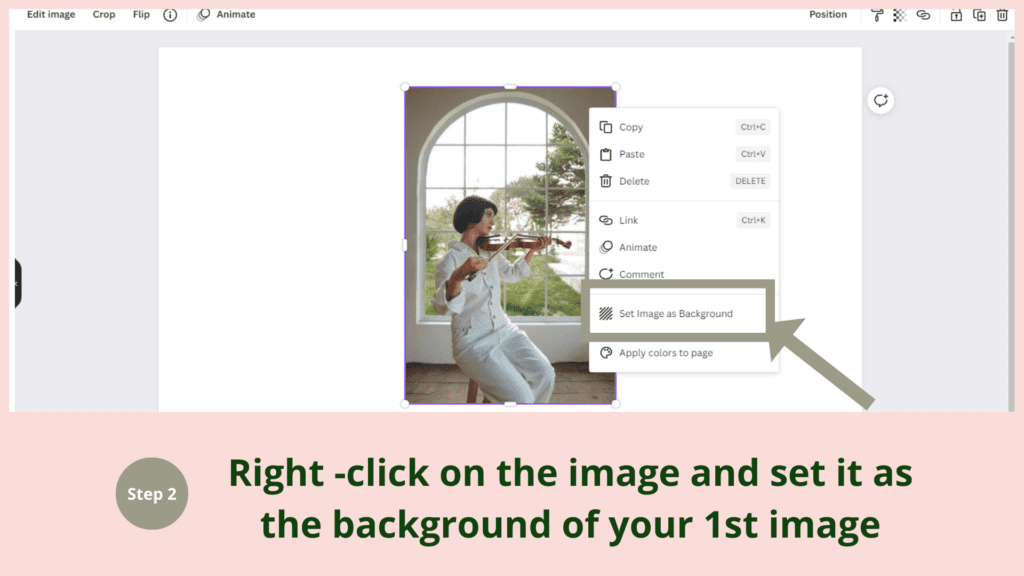
Step 2: For the first image, select it, right-click, and choose “Set as Background.”
Step 3: On the second image, click the “Edit Image” button in the top-right corner and select “Background Remover” to remove its background.
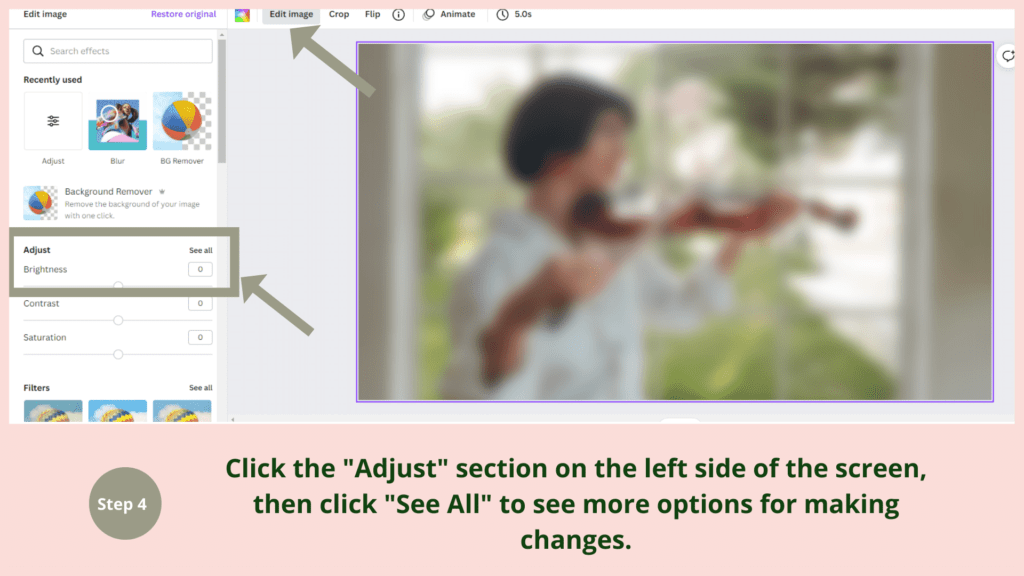
Step 4: To adjust the blur, click “Modify” on the left panel, then click “See All” under the adjustment options.
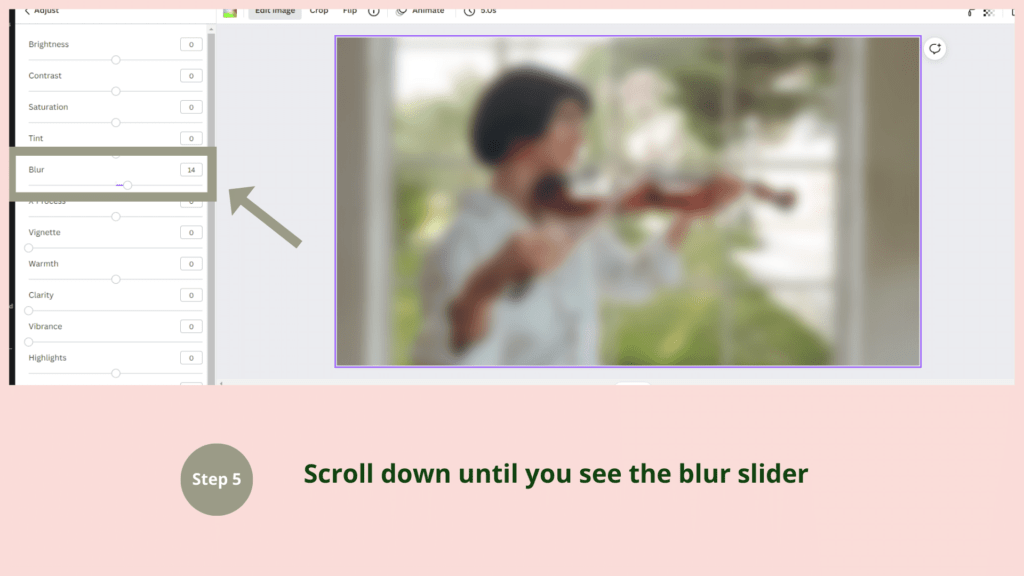
Step 5: Scroll down until you find the Blur slider, and adjust it as needed to achieve the desired effect.
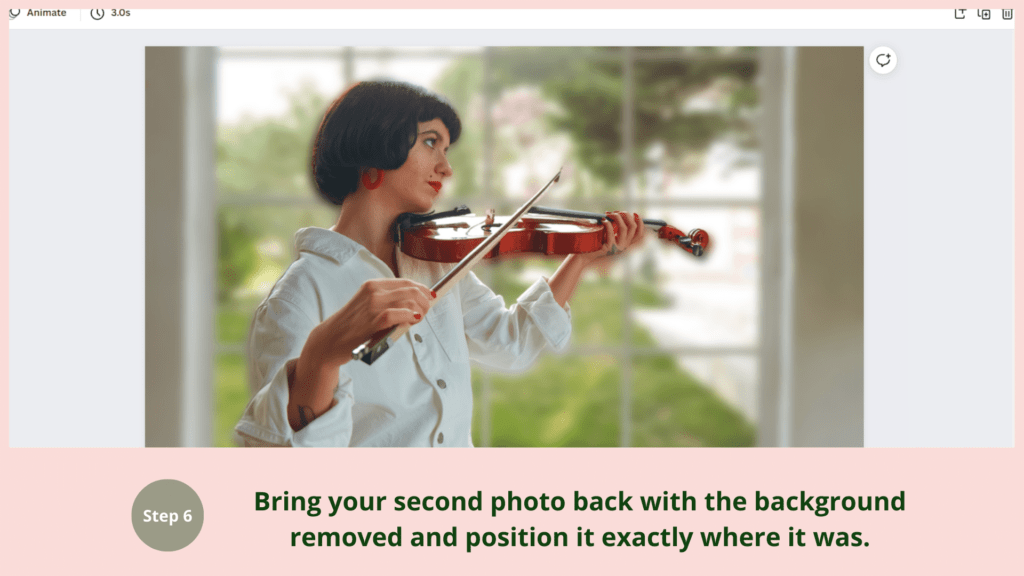
Step 6: Finally, position the second image (with the background removed) over the blurred background to align it perfectly.


Great job! You’ve successfully created a blurred background in Canva, adding a stylish and aesthetic touch to your design.
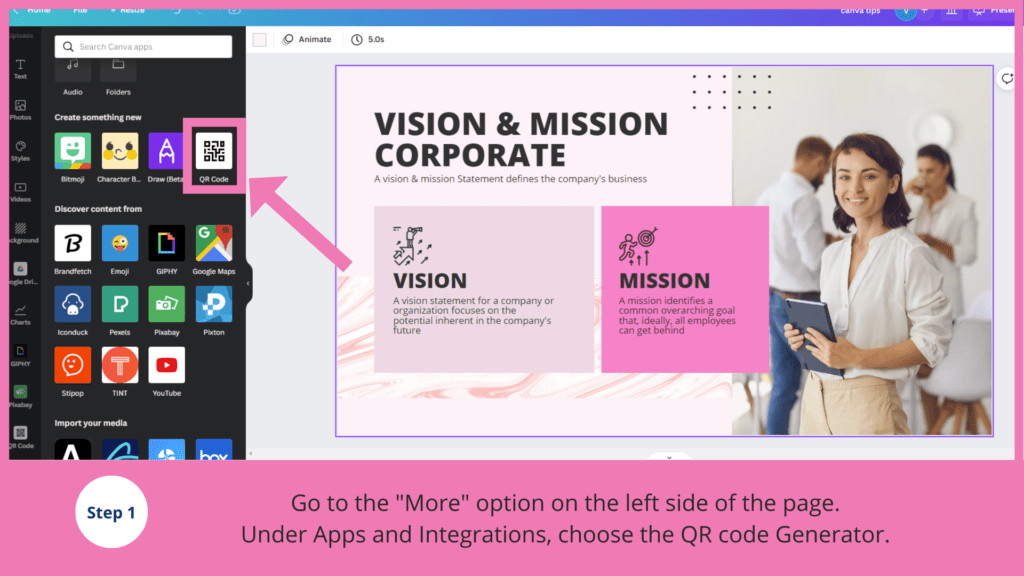
Tip 2: Enhance Your Designs with a QR Code
Add QR codes to your designs in seconds with Canva’s built-in QR code generator! This feature is particularly useful for creating business cards, flyers, or marketing materials to promote your app, website, or brand. By providing a scannable gateway to your digital content, QR codes make it easy for users to connect with your online presence and boost engagement.
Step 1: Open the Canva Editor and click on “Apps” (formerly “Extras”) in the left sidebar.
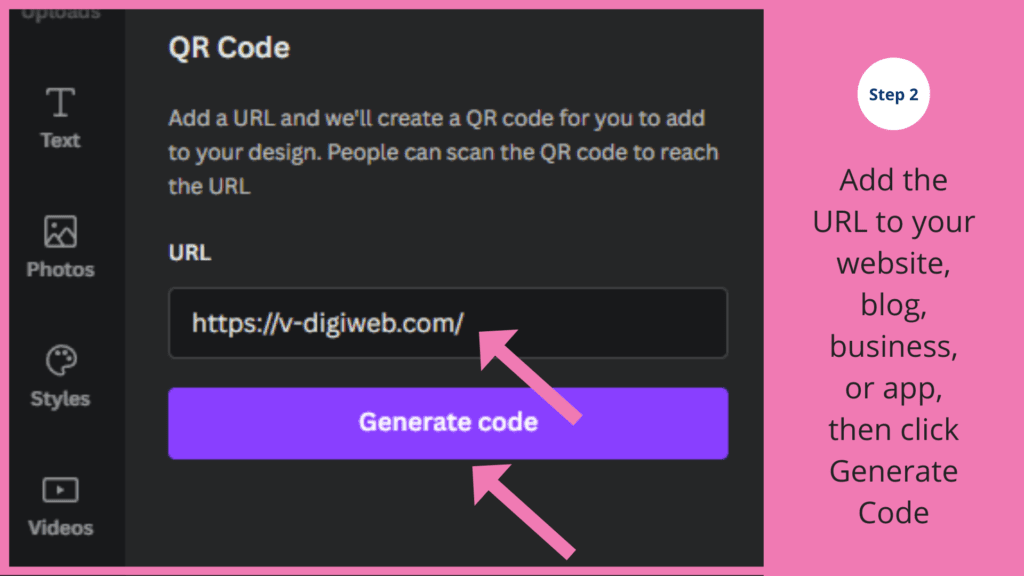
Step 2: Select the QR Code Generator, then paste the URL of your website, app, blog, or business into the input field.
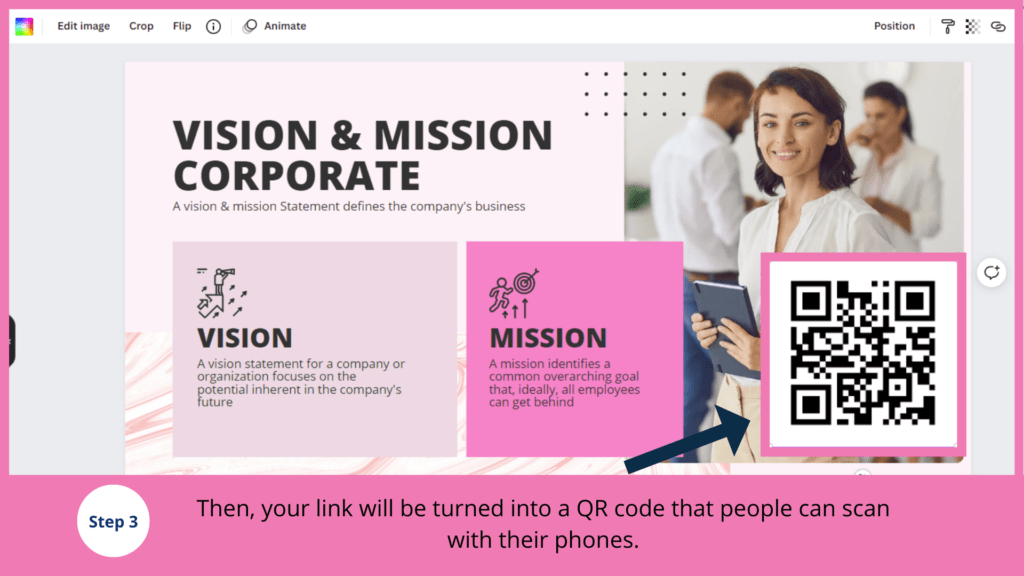
Step 3: Canva will instantly create a scannable QR code. Drag and drop it into your design, resize or position it as needed, and integrate it seamlessly into your project.
With this simple process, you can improve the functionality and interactivity of your designs while making it effortless for users to access your content.
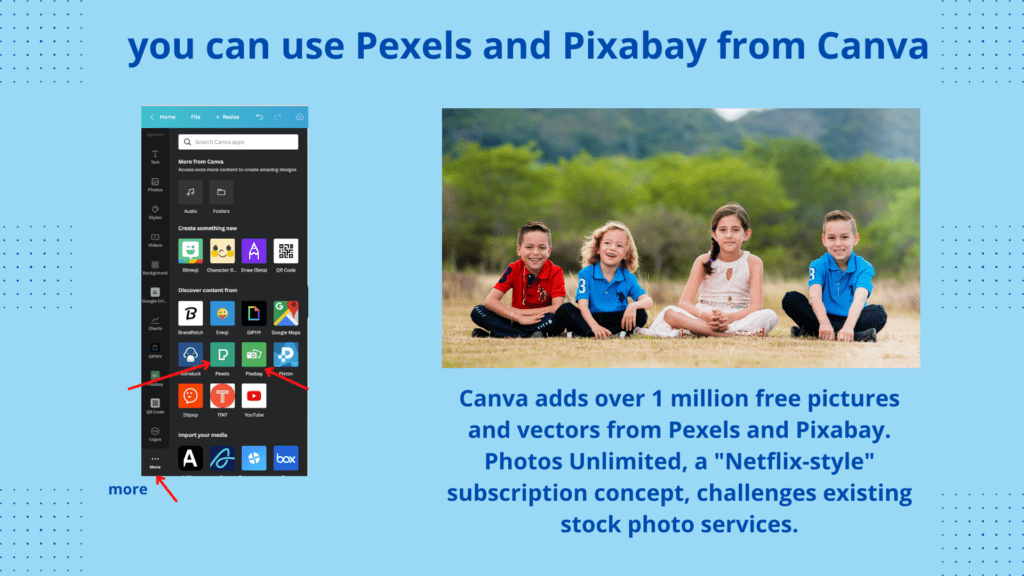
Tip 3: Access Pexels and Pixabay Through Canva
Canva offers seamless integration with Pexels and Pixabay, providing access to over 1 million free high-quality images and vectors. This is a game-changer for free plan users, enabling them to enhance their designs with diverse and professional visuals.
For even more variety, Canva’s Pictures Unlimited subscription offers an extensive stock image library, operating on a subscription model similar to Netflix. This innovative approach provides unlimited access to premium content, challenging traditional stock photo providers.
How to Use Pexels and Pixabay in Canva:
Step 1: Open the Canva Editor and click on “Apps” (formerly “Extras”) in the left sidebar.
Step 2: Under Integrations, select either the Pexels or Pixabay library.
Step 3: Search for your desired images or footage within the selected library and add them directly to your design.
With these integrations, you can easily elevate the quality of your designs without switching between platforms!
Tip 4: Create a Website with Canva
Canva’s intuitive drag-and-drop interface makes it easy for anyone—even without design or coding experience—to create professional-looking websites. Whether it’s a portfolio, landing page, or a simple informational site, Canva provides the tools you need to design with ease.
How to Create a Website Using Canva:
- Sign Up: Create a free Canva account or log in.
- Select a Template: Choose a website template from Canva’s library.
- Customize Your Design: Add your logos, colors, fonts, and graphics to make it uniquely yours.
- Design Your Website: Arrange elements, add images, and create engaging layouts.
- Publish Your Site: Click “Publish” to generate a Canva link (e.g., canva.com/design/…).
- Share the Link: Use tools like Bitly.com to shorten the link for easier sharing.
- Optional: Purchase a custom domain to personalize your website’s URL.
- Update Easily: Make changes directly in Canva whenever needed.
Pro Tip: While Canva links are not customizable, shortening them or using a custom domain makes your site more professional and user-friendly. Canva’s website builder is perfect for projects that require quick, visually appealing designs without ongoing updates.


Tip 5: Create Stunning Visuals with Smart Mockups in Canva
Canva’s Smart Mockups feature is perfect for creating professional visuals for social media, ads, websites, and more. It offers a variety of mockup options, including:
- Laptop and computer screens
- Phone screens
- Product mockups for hoodies, mugs, books, t-shirts, envelopes, cards, stickers, cars, and more
How to Use Smart Mockups in Canva:
- Create Your Design: Start by designing your image or graphic in Canva.
- Access Smart Mockups: Click the “Share” tab in the top-right corner and search for “Smart Mockups.”
- Sign Up: Use your email address to sign up for Smart Mockups if prompted.
- Apply Your Design: Choose a mockup template and seamlessly integrate your design into it.
With Smart Mockups, you can bring your designs to life, making them stand out in any medium, from product promotions to brand presentations.

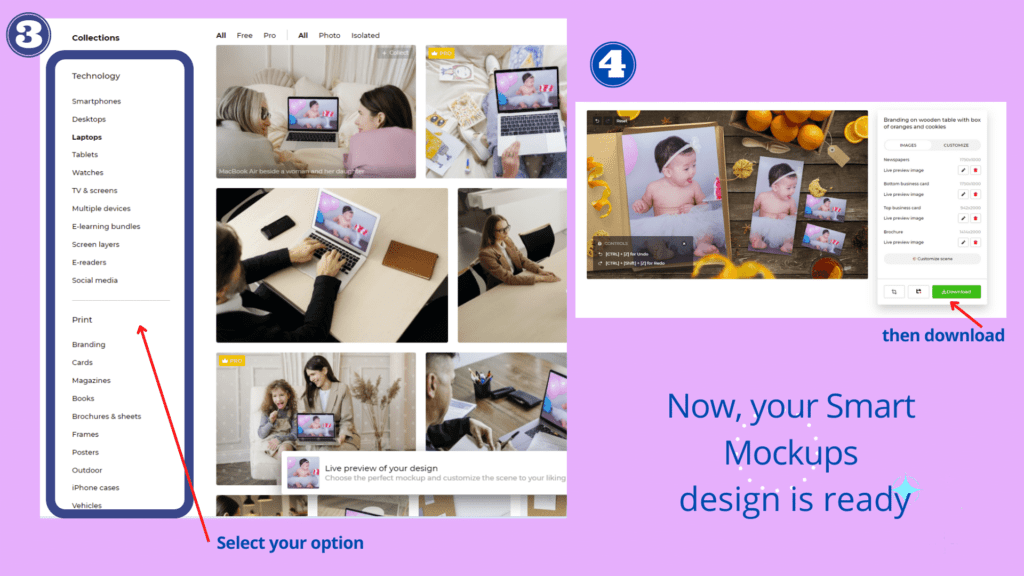
Now that your Smart Mockups design is full, you could take a look at it earlier than printing.
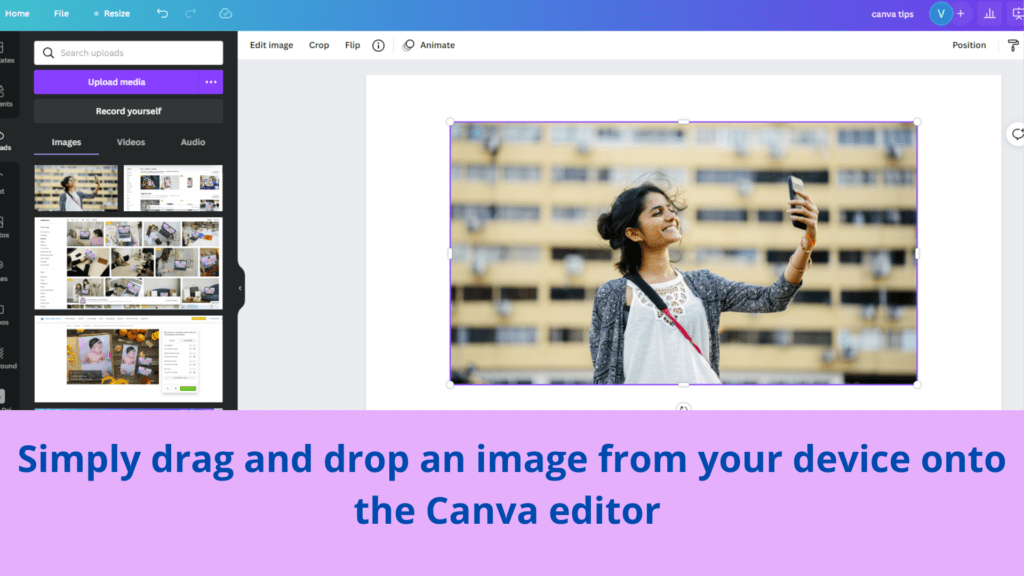
Tip 6: Quickly Add Photos with Drag-and-Drop
Save time by skipping the manual upload process! Instead, drag an image directly from your computer and drop it into the Canva Editor. The image will automatically upload and be ready for editing.
This smart and efficient method lets you focus on designing rather than managing files, making it perfect for those working on tight schedules.
Tip 7: Select Elements Behind Others Using the Layers Hack
Working with overlapping elements in Canva can be tricky, but there’s a simple shortcut to select and edit elements hidden behind others without disrupting your design.
How to Select Hidden Elements:
- Press Ctrl + Click (Windows) or Cmd + Click (Mac) repeatedly on the overlapping area to cycle through the layers.
- Once you’ve selected the desired element, you can move or edit it independently without affecting other layers.
This shortcut makes managing layers in Canva effortless, saving time and eliminating frustration when dealing with complex designs.

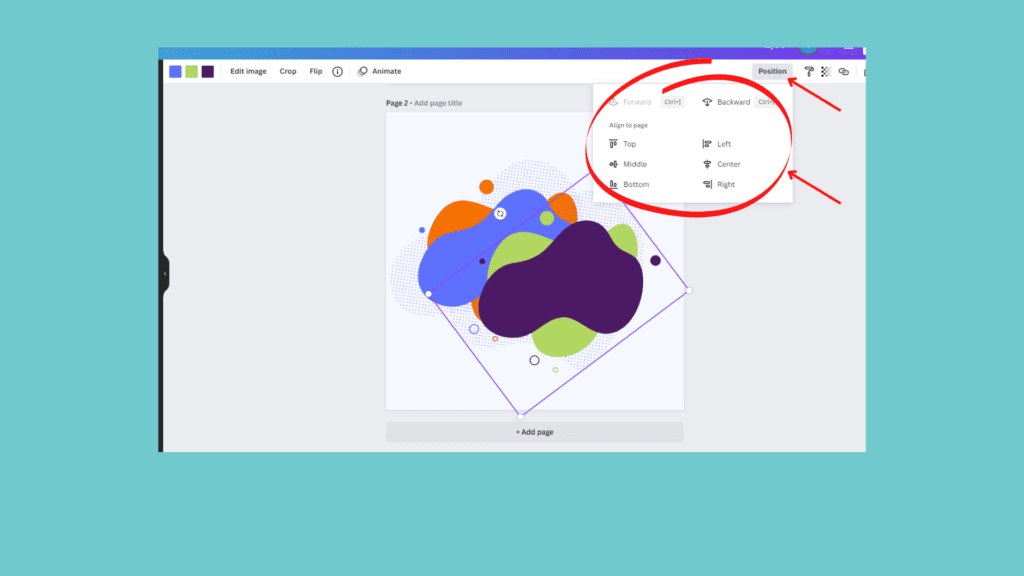
You can also adjust the image’s position in other ways, as Canva offers numerous options for placement and alignment
Tip 8: Evenly Space Objects in Canva with the Tidy Up Feature
Alignment is crucial in design as it helps organize elements and creates a more readable layout. However, manually spacing elements can sometimes lead to small errors.
Luckily, Canva’s Tidy Up feature makes this process effortless, allowing you to evenly space objects with just one click.
How to Use the Tidy Up Feature:
- Select the elements you want to align.
- Click on “Position” in the toolbar.
- Choose the alignment direction: Right, Left, Center, Top, Bottom.
- Click “Tidy Up” to evenly space your selected objects.
With the Tidy Up feature, you can ensure consistent, visually appealing layouts every time.

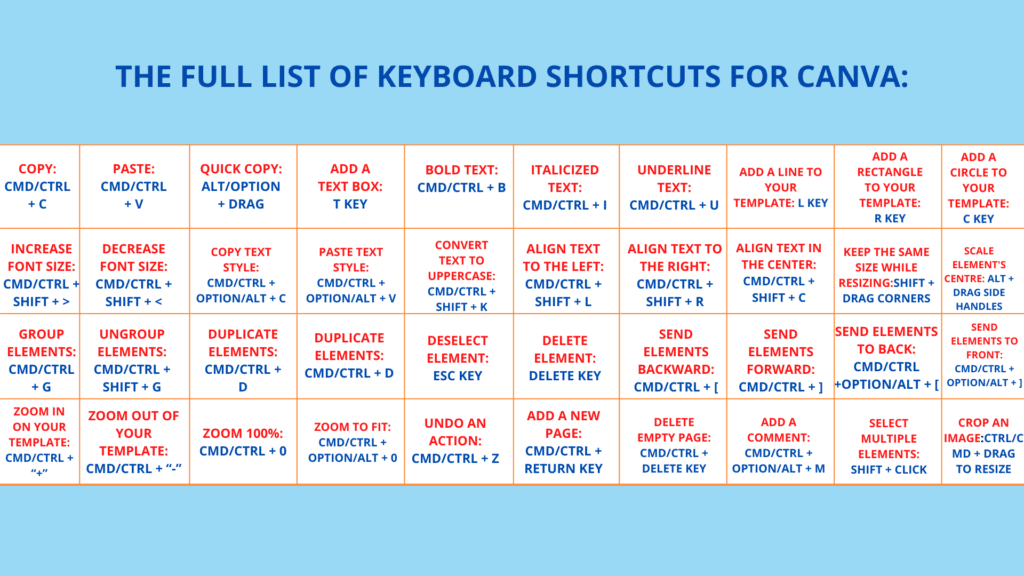
Tip 9: Canva Keyboard Shortcuts for Faster DIY Graphic Design
Learning Canva keyboard shortcuts can significantly speed up your design process, whether you’re creating social media graphics, presentations, or opt-in templates. Mastering these shortcuts saves you time and allows for a smoother design experience.
Canva offers a variety of keyboard shortcuts to make your workflow more efficient. You can discover all of them on Canva’s website, which features an infographic of the most useful shortcuts.
By integrating these shortcuts into your routine, you’ll be able to design faster and more effectively.
Tip 10: Group Elements in Canva for Easier Editing
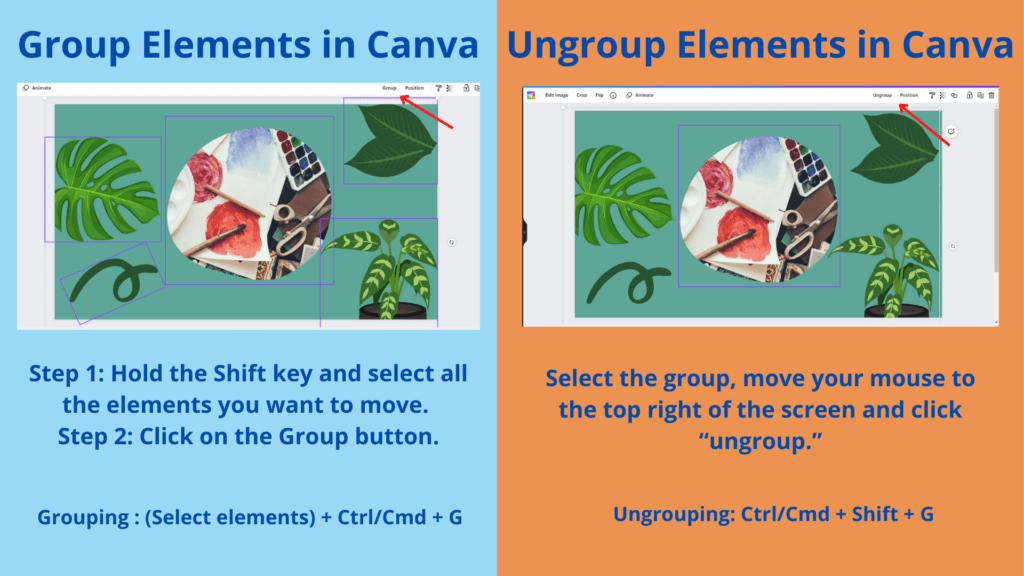
When elements in your design overlap or are too close together, it can be difficult to work with them individually. Grouping elements makes it easier to move and edit multiple items at once. You can also easily ungroup them if needed.
How to Group Elements:
- Hold down the Shift key and click on all the elements you want to group.
- Click the “Group” button in the top toolbar.
Alternatively, use the keyboard shortcuts:
- Group: Select elements and press Ctrl/Cmd + G.
- Ungroup: Select the group and press Ctrl/Cmd + Shift + G.
Grouping elements is a simple yet powerful way to streamline your design process and make adjustments quickly.
Tip 11: Create a Text Mask in Canva
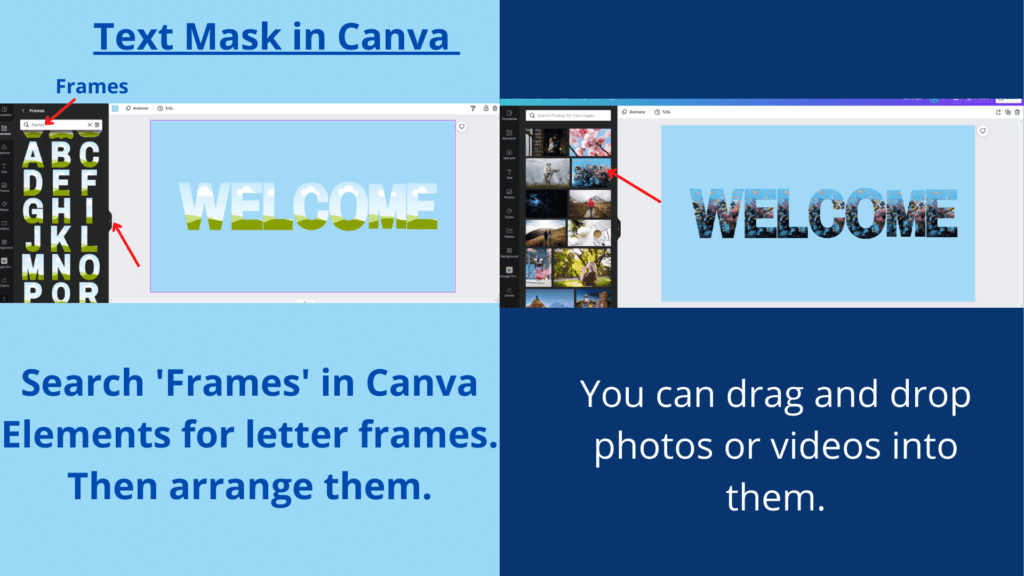
Did you know Canva allows you to create text masks? This feature enables you to display images, gradients, patterns, or even videos within a block of text. It’s a great way to add unique and eye-catching elements to your designs.
How to Create a Text Mask:
- Search for “Frames” in the Canva Elements tab to find letter-shaped frames.
- Select and arrange the frames to form your desired text.
- Drag and drop images or videos into the frames, and they will automatically fill the shape of the text.
Text masks are a fun and creative way to elevate your designs, adding depth and interest to your typography.
Tip 12: Embed Your Designs, Videos, and Blog Posts with Canva
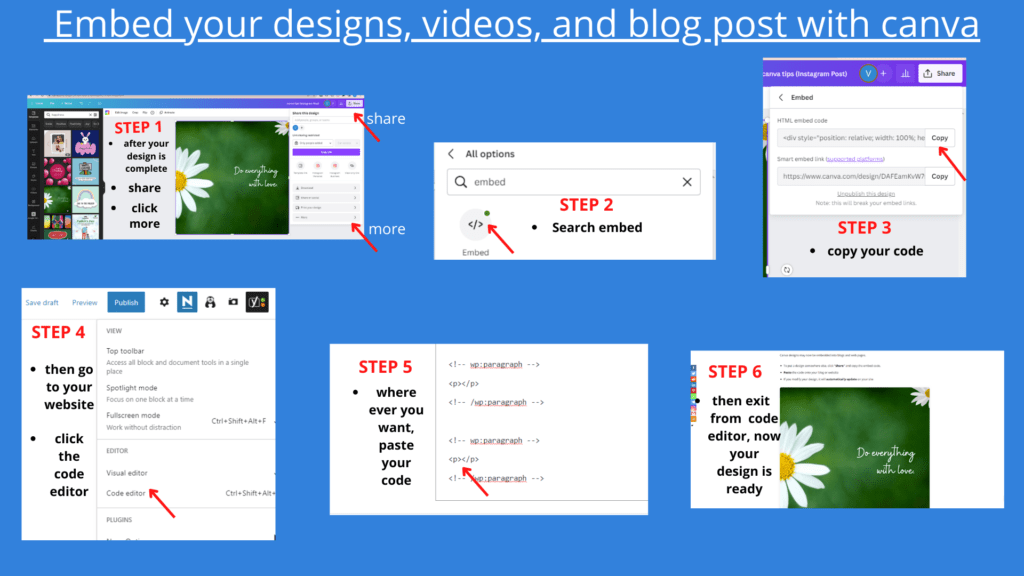
Canva now allows you to easily embed your designs, videos, and blog posts directly into websites and blogs. This feature ensures that any updates made to your design are automatically reflected on your site.
How to Embed Your Design:
- Click on “Share” in the top right corner of your Canva design.
- Select “Embed” and copy the embed code.
- Paste the code into your website or blog’s HTML section.
Whenever you make changes to your design in Canva, they will automatically update on your site, keeping your content fresh without any extra effort.
Tip 13: Collaborate with Your Team in Canva
Canva offers several ways to work together with your team on designs, making collaboration seamless and efficient. Whether you’re sharing via links, design folders, or email, Canva ensures everyone stays on the same page.
How to Collaborate with Your Team:
- Share Designs with Links:
- To share a design via link, click on the “Share” button and copy the link from the Collaborate menu.
- You can choose whether the recipient has view-only access or can edit the design as well.
- Invite via Email:
- To invite team members by email, enter their email addresses in the Collaborate dropdown. You can specify their level of access, either viewing or editing permissions.
- Share Design Folders (Canva Pro):
- If you’re using Canva Pro, you can create design folders to organize and share company assets, templates, or branded materials like logos and pitch decks.
- To share a folder, click on the folder’s title on your homepage, then select the “Share” button in the top-right corner.
- Decide who can view or edit the contents of the folder, ensuring proper access control for your team.
These collaboration tools ensure everyone involved can easily contribute, update, and manage designs together, improving workflow and efficiency.
Tip 14: Comment When Working Together
When multiple designers are collaborating on a project, leaving feedback is essential for smooth communication and effective collaboration. Canva makes it easy to share your thoughts directly on the design.
How to Leave Comments:
- Select the Comment Bubble Icon:
- While working on your design, simply click on the comment bubble icon next to the canvas.
- Add Your Feedback:
- A comment box will appear where you can type your thoughts, suggestions, or questions related to specific elements of the design.
- Tag Team Members:
- You can tag team members by typing “@” followed by their name. This will notify them directly, ensuring they see your comment.
This feature helps keep everyone on the same page, streamlining feedback and revisions without needing to leave the platform.

Tip 15: Change the Background with a Gradient
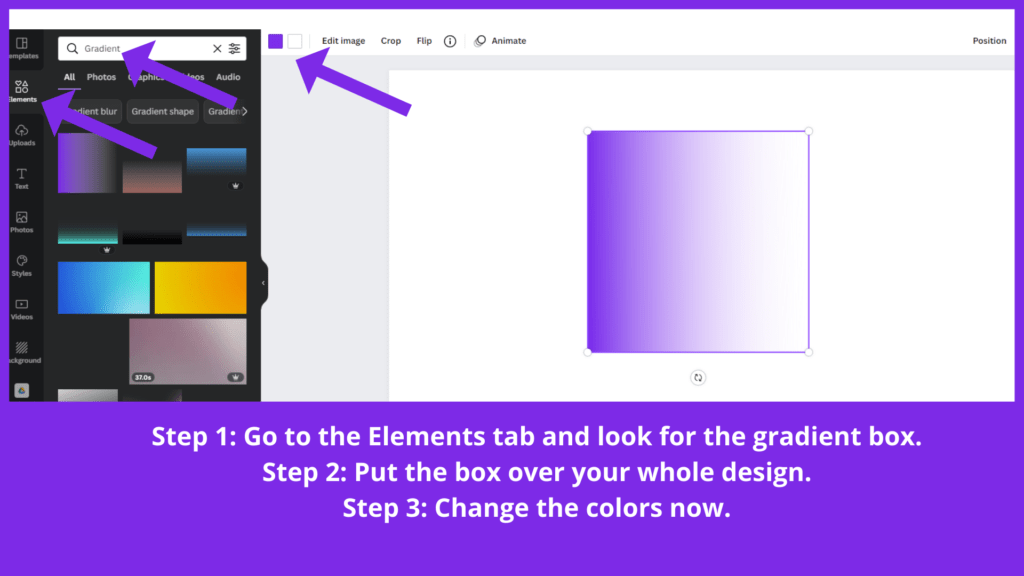
Adding a gradient background to your design can create a smooth, visually appealing transition between colors, adding depth and interest.
How to Add a Gradient Background:
- Search for Gradient Box:
- Go to the Elements tab and search for “gradient” to find gradient boxes or elements.
- Place the Gradient Box:
- Drag the gradient box over your entire design, ensuring it covers the background fully.
- Adjust the Colors:
- Click on the gradient box and customize the colors to suit your design. You can select colors from the color palette or input custom hex codes for precise control over the gradient.
This simple yet effective trick enhances the visual appeal of your design by introducing color variation and depth.
Tip 16: Make Text Curve and Add Effects in Canva
Canva allows you to create dynamic and eye-catching text by applying various effects, including curves. This feature is especially useful for designing logos, banners, or any design that needs a creative text style.
How to Curve Text and Apply Effects:
- Select the Text:
- Click on the text element in your design that you want to modify.
- Click on “Effects”:
- In the top toolbar, click on the Effects button to open the text effects options.
- Apply the Curve Effect:
- From the list of available effects, choose Curve.
- Use the slider to adjust the degree of curvature. This allows you to control how much the text bends.
- Apply Other Effects (Optional):
- You can experiment with other effects like Shadows, Hollows, Neon, Echoes, or Glitch to further enhance the text’s visual appeal.
This is a great way to add creative flair to your designs, making your text stand out and look more dynamic.

You’ll be able to modify the diploma of curvature by utilizing a slider bar underneath the Curve impact. It’s helpful for creating logos.

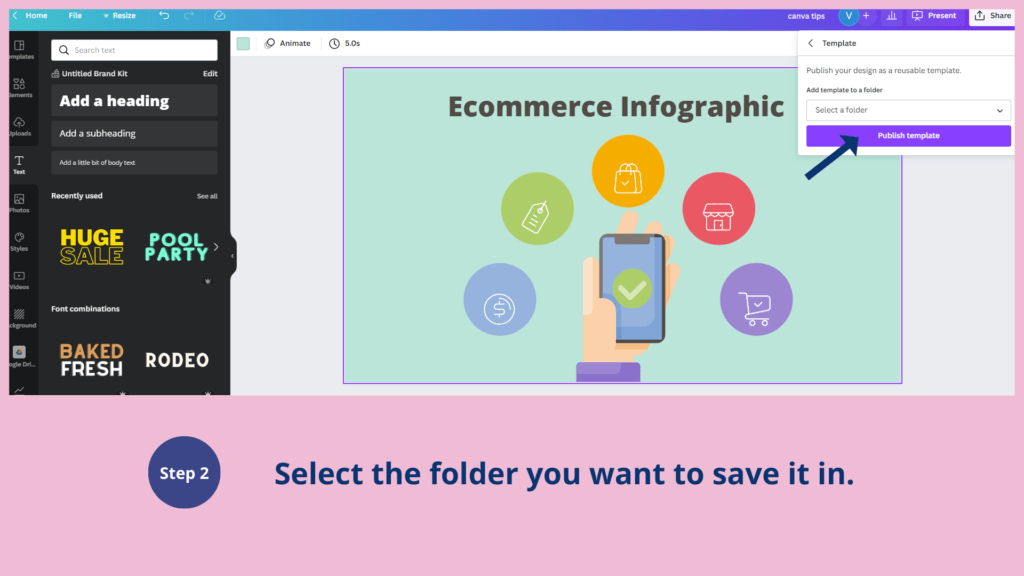
Tip 17: Turn a Design into a Template in Canva
If you want to save time by reusing your designs, turning them into templates in Canva can be a game-changer. This feature is available with Canva Pro and allows you to quickly start future projects with pre-designed templates, which can be especially helpful for social media posts, presentations, and other repetitive tasks.
How to Turn Your Design into a Template:
- Create Your Design:
- Design your project just like you normally would, whether it’s for Instagram, Facebook, or any other platform.
- Save as Template:
- Once you’re happy with your design, click on the three dots in the menu bar above your design.
- Scroll through the options and select “Publish as Template.”
- Use the Template:
- After saving, your design will be saved as a reusable template, which you can access and start new projects from, maintaining the same layout and style.
By creating templates, you ensure consistency in your designs, and you can quickly edit and reuse them as needed, saving you valuable time.
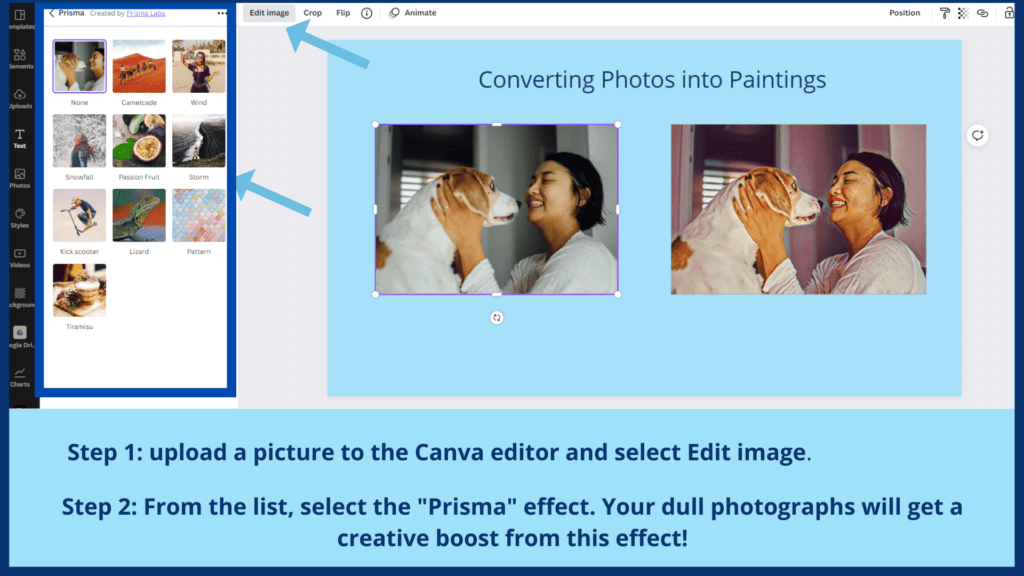
Tip18: Converting Images into Paintings with Canva
Transforming your ordinary photos into stunning digital paintings is a breeze with Canva. This feature allows you to add an artistic flair to your images, making them ideal for creative projects like social media posts, digital art, or even framed prints.
Steps to Convert Images into Paintings:
- Upload Your Image:
- Open the Canva editor and upload the image you want to transform.
- Edit the Image:
- Select your image and click on the “Edit image” option in the toolbar.
- Apply the Prisma Effect:
- From the list of effects, find and choose “Prisma.”
- Explore the various Prisma styles (there are 10 different options) to find one that best fits your desired look.
- Customize Further:
- Adjust the intensity of the effect or tweak additional settings (e.g., brightness, contrast) to refine the painted appearance.
With the Prisma effect, you can give your dull images a vibrant artistic boost, perfect for making your visuals stand out.
Tip 19: Directly Use Images in Canva
Gone are the days of downloading and re-uploading images! Canva allows you to streamline the process by directly copying and pasting images from the web into the Canva editor.
Steps to Use an Image Without Downloading:
- Find an Image Online:
- Browse the web for the image you’d like to use.
- Copy the Image:
- Right-click on the image and select “Copy Image.”
- Paste into Canva:
- Open your Canva design.
- Simply press Ctrl+V (Windows) or Cmd+V (Mac) to paste the image into your project.
This method saves time and keeps your workflow seamless, letting you focus on designing without interruptions.
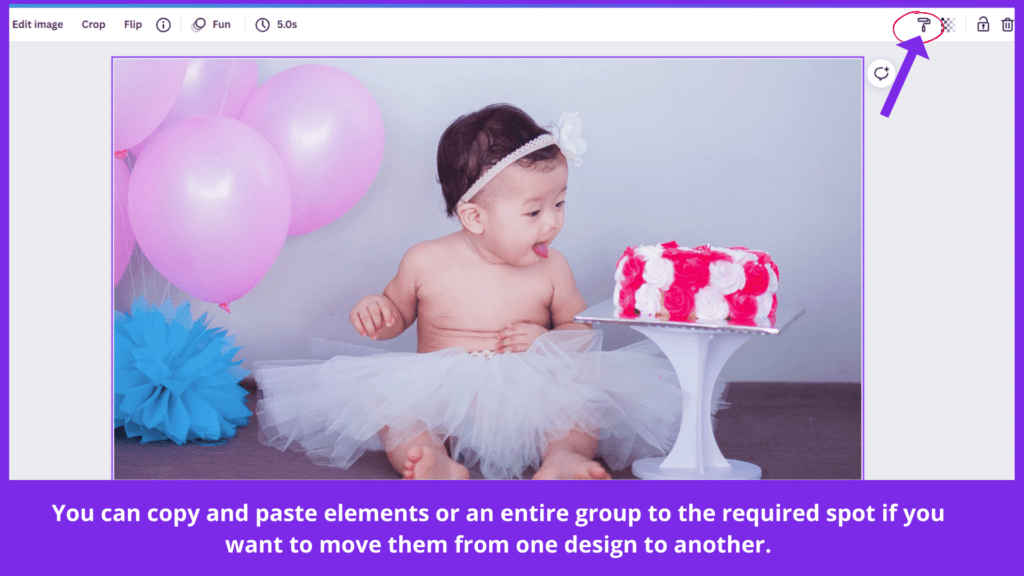
Tip 20: Copy an Element’s Style in Canva
Canva makes it easy to replicate the style of an element or group, including its colors, fonts, effects, and even links, to other designs or locations within your project. This feature streamlines your design process and ensures consistency.
How to Copy an Element’s Style:
- Select the Element:
- Click on the element or group whose style you want to copy.
- Copy the Style:
- Use Ctrl+C (Windows) or Cmd+C (Mac) to copy the element.
- Paste the Style:
- Navigate to the desired spot in your design (or another Canva design).
- Use Ctrl+V (Windows) or Cmd+V (Mac) to paste the copied element.
Key Benefits:
- Retains all formatting, including colors, effects, and links.
- Perfect for ensuring uniformity across different designs or projects.
- Saves time by eliminating the need to reapply styles manually.
This feature is particularly handy when creating templates, presentations, or multi-page designs where consistency is crucial.
Tip 21: Removing Image Backgrounds in Canva
One of Canva’s most powerful and popular features is its Background Remover, available exclusively for Canva Pro users. This tool allows you to isolate the main subject of an image by effortlessly removing its background, making your designs cleaner and more professional.
How to Remove an Image Background in Canva:
- Upload or Select an Image:
- Add your own image or choose one from Canva’s extensive library.
- Access the Effects Tool:
- Select the image, then click on the Effects button in the top toolbar.
- Choose “Background Remover”:
- In the Effects panel, click on the Background Remover option.
- Let Canva Work Its Magic:
- Wait a few seconds as Canva automatically removes the background.
Additional Features:
- Fine-Tuning: After the background is removed, use the Erase or Restore tools to refine the edges manually if needed.
- Add Creativity: Replace the background with gradients, colors, patterns, or custom images to create stunning visuals.
Use Cases:
- Product Mockups: Showcase items without distractions.
- Profile Pictures: Create clean, professional headshots.
- Social Media Graphics: Make eye-catching posts with transparent elements.
This feature saves time and eliminates the need for complicated editing tools, making it a favorite among Canva users.

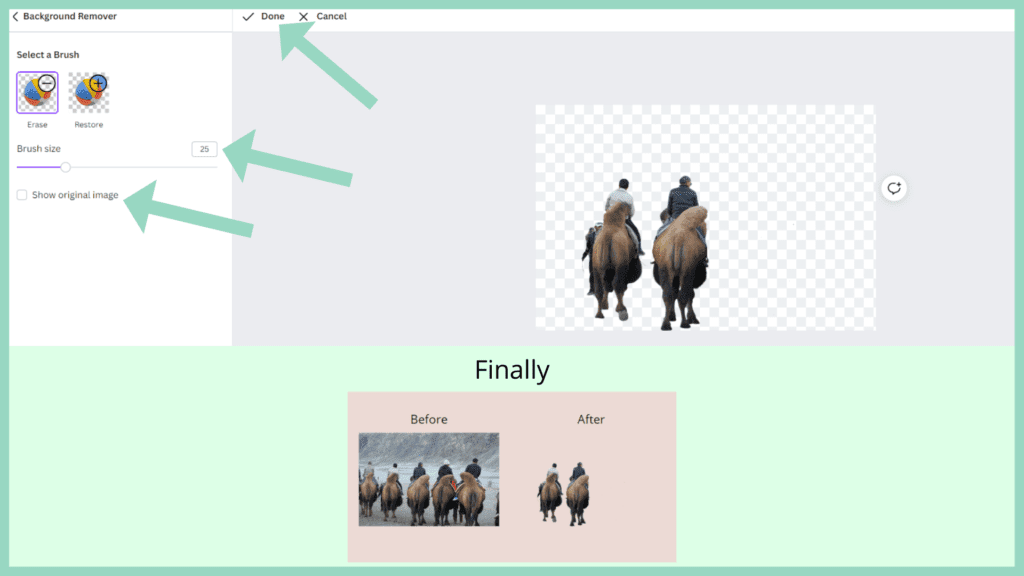
Fine-Tuning Background Removal: The Erase and Restore Tools in Canva
While Canva’s Background Remover works flawlessly for most images (approximately 97% of the time), there may be instances where adjustments are necessary. Canva’s Erase and Restore tools help refine the results to achieve a perfect edit.
How to Use Erase and Restore Tools:
- Activate Background Remover:
- After selecting the image and applying the Background Remover, locate the Erase and Restore tools.
- Adjust the Brush Size:
- Customize the Brush Size for precise edits:
- Use a smaller brush for detailed areas.
- Use a larger brush for broader corrections.
- Customize the Brush Size for precise edits:
- Erase Unwanted Parts:
- If the remover leaves unwanted background elements, use the Erase tool to manually remove those areas.
- Restore Essential Parts:
- If Canva removes parts of the image you wish to keep, switch to the Restore tool to bring those areas back.
- Preview and Refine:
- Toggle the view to the original image to compare your edits and ensure nothing critical is accidentally removed.
Tips for Best Results:
- Zoom In: Work closely on the image to refine edges more accurately.
- Save Iteratively: Keep saving versions of your design as you edit to avoid losing progress.
- Practice: The more you use these tools, the quicker and more efficient you’ll become.
These tools are ideal for creating polished designs when the auto-removal isn’t perfect. Whether you’re crafting professional visuals or unique creations, Canva’s fine-tuning features ensure your images look exactly how you envision them.
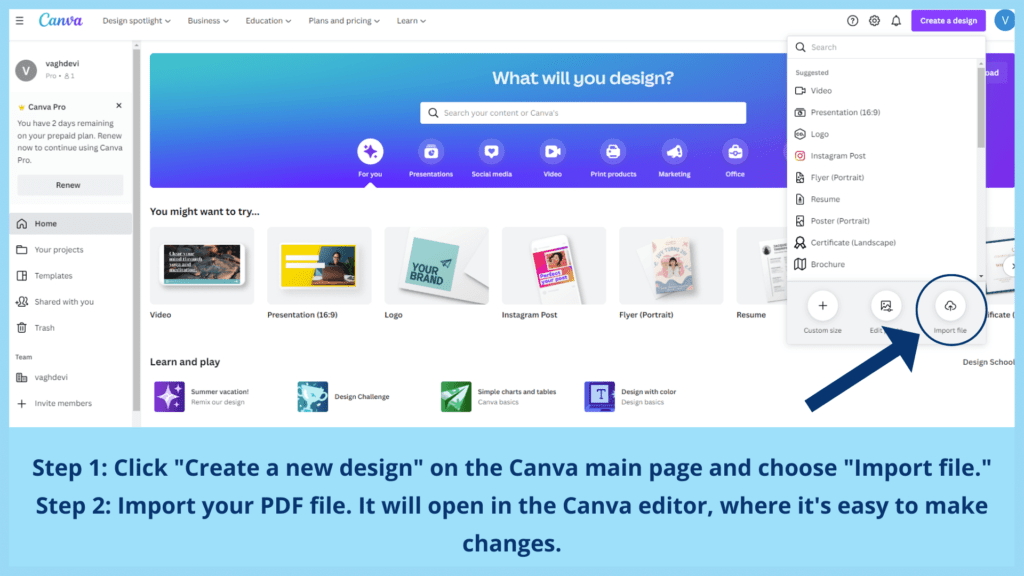
Tip 22: Import and Edit PDF Files in Canva
Canva makes working with PDFs seamless, allowing users to import, edit, and enhance PDF files with ease. This feature is available for free and comes with a host of options for converting and exporting designs.
How to Import and Edit PDFs in Canva:
- Start a New Design:
- On the Canva homepage, click “Create a New Design” and select “Import file.”
- Upload Your PDF:
- Locate and upload the desired PDF file from your computer.
- Once uploaded, Canva automatically opens it in the editor, converting its contents into editable elements.
- Edit Your PDF:
- Adjust text, colors, images, or layout elements just as you would with any Canva design.
- Add annotations, graphics, or other enhancements to make your PDF more visually appealing.
- Export Your Work:
- Save your edited file in a variety of formats:
- JPEG or PNG for images.
- SVG, PPT, or print-ready PDF for presentations and professional purposes.
- Save your edited file in a variety of formats:
- Share or Collaborate:
- Use Canva’s sharing features to collaborate with your team or directly share the updated design online.
Why Use Canva for PDFs?
- Ease of Use: No complicated software required.
- Creative Freedom: Enhance PDFs with Canva’s vast library of templates, fonts, and design elements.
- Versatile Exports: Seamlessly convert designs for multiple platforms or formats.
Canva’s PDF editing capability transforms static documents into dynamic, shareable assets, making it an essential tool for both creative and professional projects.
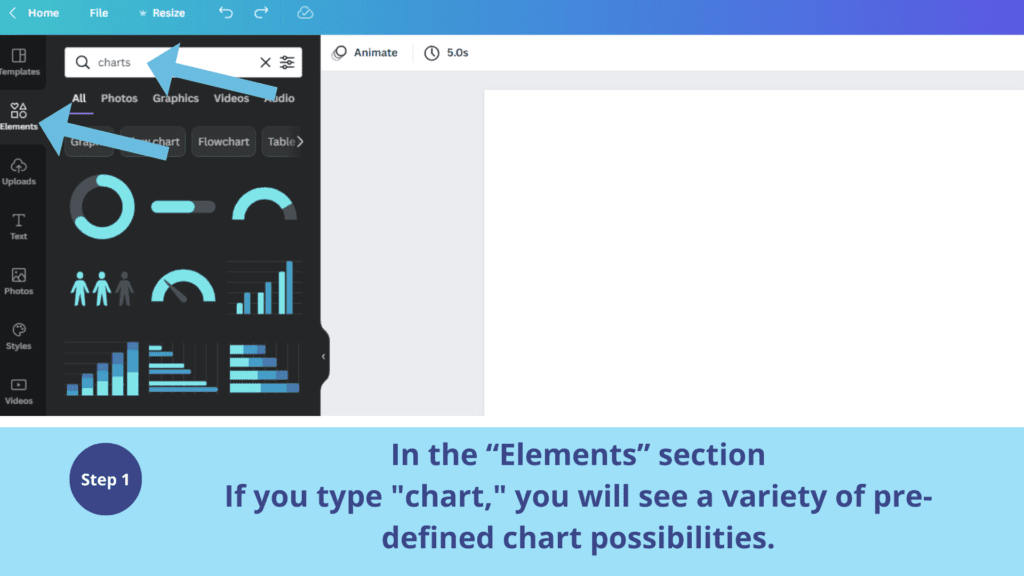
Tip 23: Create Graphs and Charts in Canva
Graphs and charts are powerful tools to simplify complex information and communicate ideas visually. Canva makes it easy to create professional and customizable charts in just a few steps.
How to Create Graphs and Charts in Canva:
- Search for Charts:
- In the “Elements” section on Canva, type “Charts” into the search bar.
- Browse a variety of chart types, including bar graphs, line graphs, pie charts, flowcharts, and more.
- Select Your Chart Type:
- Choose a chart style that best represents your data and suits your design needs.
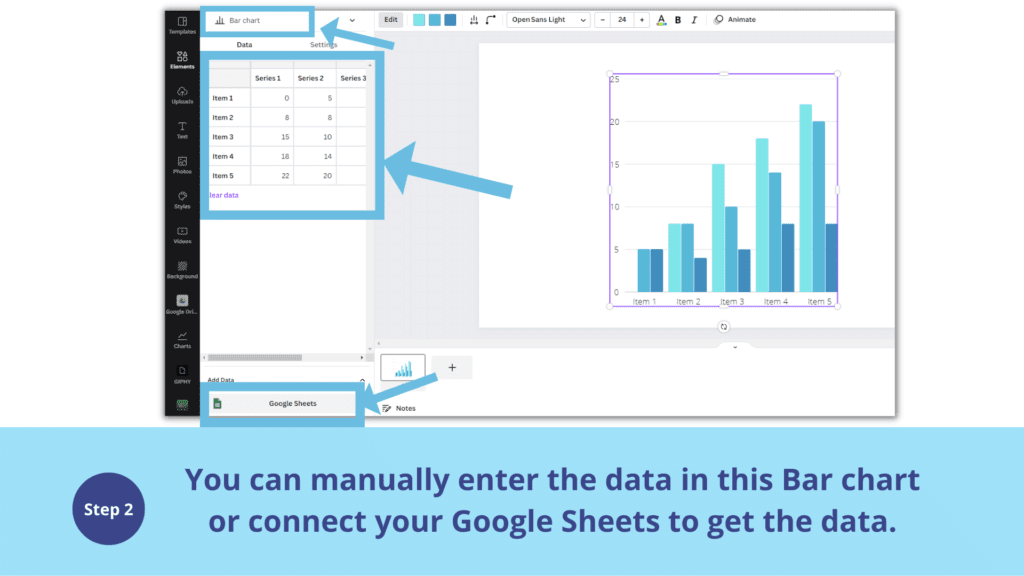
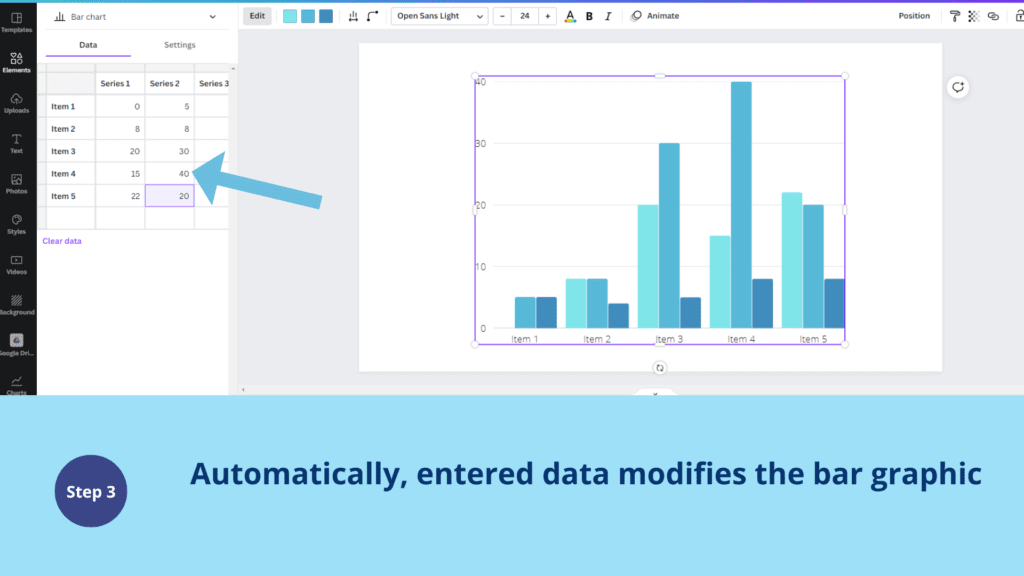
- Enter Data & Edit the Chart:
- Click on the chart to access the data editor.
- Input your data directly into the fields. Canva automatically updates the chart to reflect the changes.
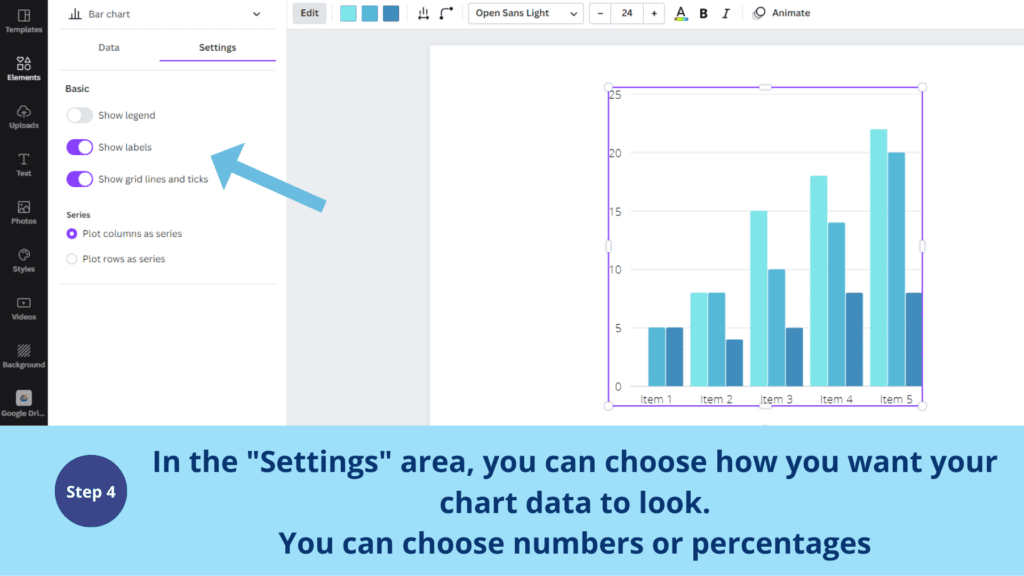
- Customize Details and Settings:
- Adjust colors, fonts, and chart elements to align with your design or brand identity.
- Add labels, legends, or titles for better clarity and context.
Why Use Charts in Canva?
- Ease of Use: Simplifies data visualization with an intuitive editor.
- Customizable Designs: Match charts to your brand’s aesthetic with Canva’s design tools.
- Versatile Applications: Suitable for presentations, reports, infographics, and more.
In just a few clicks, Canva enables you to transform raw data into engaging visuals, making it ideal for conveying information effectively.
Tip 24: Use Grids in Canva to Create Picture Collages
Photo collages are an excellent way to combine multiple images into a visually appealing composition. Canva’s Grids feature simplifies the process, allowing you to design custom collages effortlessly.
How to Create Picture Collages Using Canva Grids
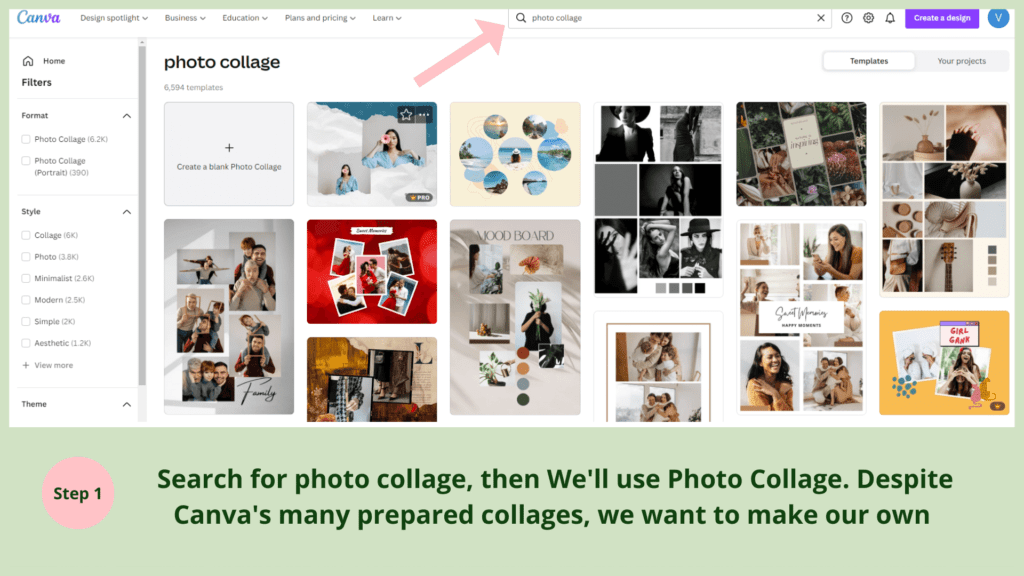
- Browse Canva’s Templates:
- Start by exploring Canva’s pre-designed collage templates for inspiration.
- If you prefer to create your own collage, click on “Create a blank design” from the collage thumbnail.
- Add a Grid:
- In the “Elements” section, search for “Grids” and select a layout that fits your design idea.
- Drag and drop the grid onto your canvas.
- Insert Your Pictures:
- Upload your images by clicking “Uploads” in the sidebar, or select photos from Canva’s vast library.
- Drag and drop the pictures into the grid’s frames. Adjust the positioning and scale as needed.
- Customize with Borders and Text:
- Add borders around the frames to enhance the collage’s appearance.
- Use text elements to include captions, titles, or labels for a personalized touch.
Why Use Canva Grids for Collages?
- Effortless Organization: Grids automatically align images for a polished look.
- Creative Flexibility: Customize layouts, colors, and spacing to match your style.
- Enhanced Visual Appeal: Perfect for personal projects, marketing materials, or social media posts.
With Canva Grids, you can turn a collection of pictures into a cohesive and professional-looking collage in just a few steps!

Tip 25: Lock and Unlock Elements in Canva
When designing complex layouts with multiple objects and layers, selecting and editing specific elements can be challenging. Canva’s Lock and Unlock feature simplifies the process by allowing you to freeze elements in place to prevent unintentional changes.
How to Lock Elements in Canva:
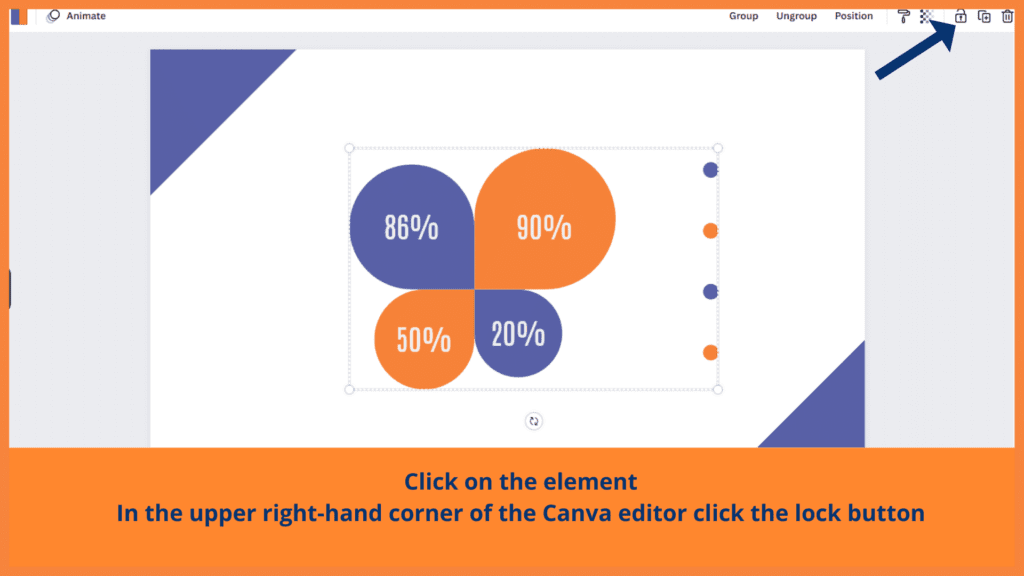
- Select the Element:
- Click on the element you want to lock (e.g., text, image, or shape).
- Lock the Element:
- In the upper right-hand corner of the Canva editor, click the lock icon.
- This locks the element in its position, making it uneditable until unlocked.
How to Unlock Elements in Canva:
- Select the Locked Element:
- Click on the locked element to highlight it.
- Unlock the Element:
- In the upper right-hand corner of the Canva editor, click the unlock icon.
- The element will now be editable and movable again.
Why Use the Lock and Unlock Feature?
- Avoid Accidental Edits: Prevent unintended changes to finalized elements.
- Simplify Layer Management: Work more efficiently with multiple layers and objects.
- Focus on Active Elements: Lock completed parts of your design to concentrate on the remaining work.
This feature is especially useful for intricate designs or collaborative projects, ensuring your layout remains organized and secure!

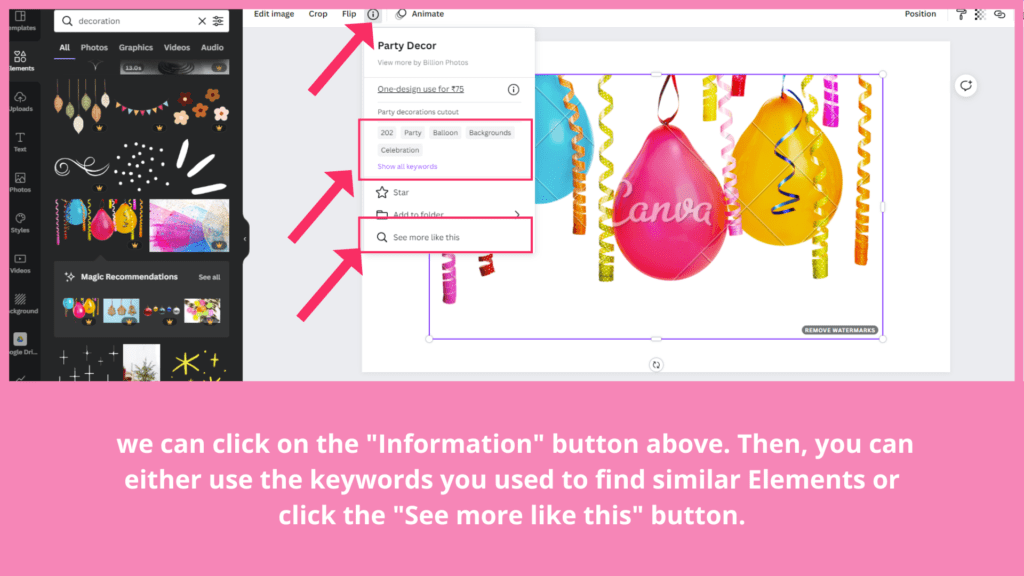
Tip 26: Find Similar Designs and Elements in Canva
Canva makes it simple and quick to explore designs or elements similar to the ones you love. This feature helps maintain consistency across your projects and discover new inspirations effortlessly.
Steps to Find Similar Designs or Elements:
- Select the Element or Design:
- Click on a design or element in your Canva project that you want to explore further.
- Click the “Data” Button:
- Look for the “i” icon or the Data button above the element.
- Find Similar Elements:
- Use the “See More Like This” button to view elements or designs with a similar style or theme.
- Explore Designer’s Collection:
- Click on “View More by Designer” to see other designs created by the same designer.
- Search Using Keywords:
- Note the keywords provided for the selected element, then use them in the Canva search bar to find related items.
Benefits of This Feature:
- Save Time: Quickly locate complementary elements or designs.
- Stay Consistent: Ensure visual coherence by using elements from the same style or designer.
- Discover Inspiration: Explore creative ideas and variations for your projects.
This feature is a game-changer for designers looking to create cohesive and visually appealing projects in less time!
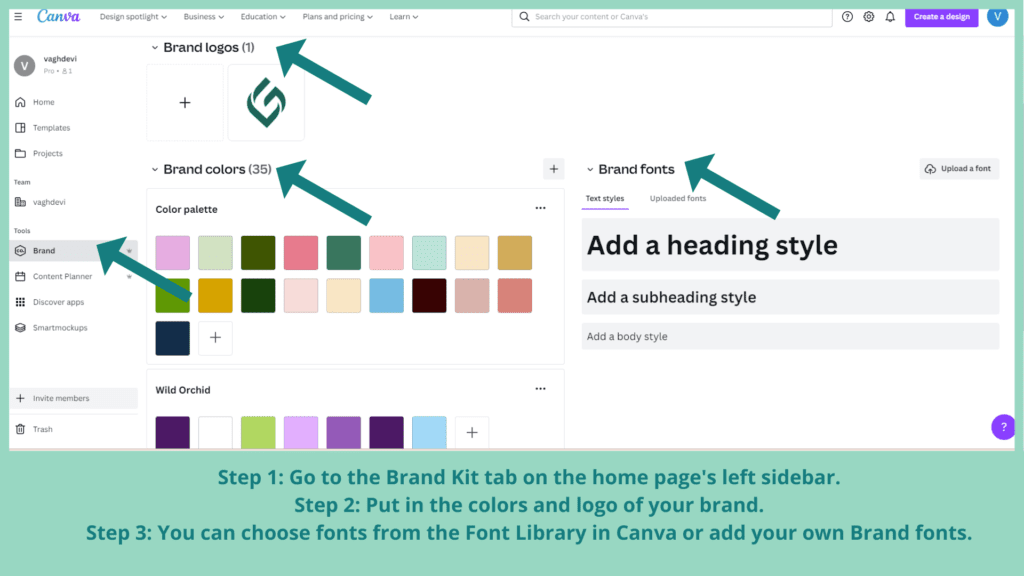
Tip 27: Use Canva’s Brand Kit to Organize Designs
Canva’s Brand Kit feature streamlines the process of maintaining consistent branding across all your designs. While it’s fully unlocked with the Pro plan, even the free version offers limited access to help you organize and apply your brand assets.
Steps to Use Canva’s Brand Kit:
- Access the Brand Kit Tab:
- On the Canva homepage, locate and click on the Brand Kit tab in the left sidebar.
- Add Brand Assets:
- Colors: Input your brand’s color palette to ensure your designs stay consistent.
- Logos: Upload your brand logos for easy access in your designs.
- Choose Fonts:
- Select from Canva’s font library or upload your custom fonts to match your brand’s style.
- Apply Your Brand to Designs:
- When creating designs, click the “Brand” button in the editor. This will automatically incorporate your brand colors, fonts, and logos into the design.
Benefits of the Brand Kit:
- Consistency: Keeps all your designs visually aligned with your brand identity.
- Efficiency: Saves time by having all brand assets readily available.
- Professionalism: Ensures your social media posts, presentations, and marketing materials are on-brand.
This tool is perfect for small business owners, marketers, and freelancers aiming for cohesive branding across multiple platforms!
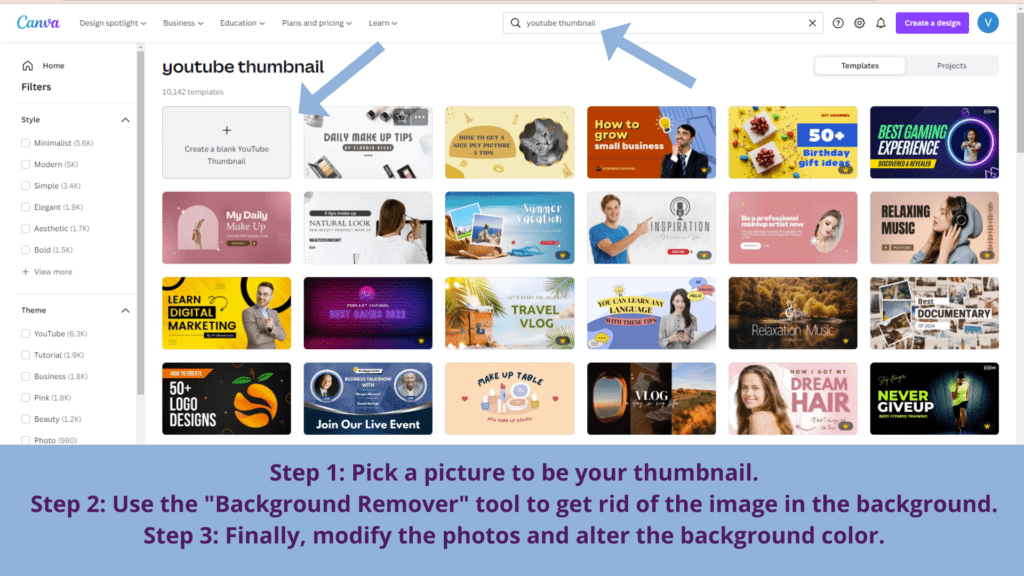
Tip 28: Create Customized YouTube Thumbnails in Canva
Stand out on YouTube with eye-catching custom thumbnails that grab attention and boost your video views. Canva offers simple tools to create visually compelling thumbnails in just a few steps.
Steps to Create a YouTube Thumbnail in Canva:
- Choose a Template or Start Fresh:
- Search for “YouTube Thumbnail” in Canva’s template library.
- Alternatively, create a blank design with the recommended YouTube thumbnail size (1280×720 pixels).
- Add a Background Image:
- Upload your image or select one from Canva’s library.
- If needed, use the Background Remover tool (Pro feature) to remove unwanted parts of the image.
- Enhance Your Visuals:
- Adjust lighting and shadows for a polished look.
- Use contrasting colors for text and background to ensure visibility.
- Include Text and Graphics:
- Add bold, clear text with attention-grabbing fonts.
- Incorporate Canva elements like icons, shapes, or stickers to emphasize key details.
- Modify Background Colors:
- Experiment with different colors to match your theme or branding.
- Review and Download:
- Double-check for clarity and consistency.
- Download your design as a PNG file for the best quality.
Pro Tips:
- Use close-up images of faces with expressive emotions to grab viewers’ attention.
- Keep your design simple and avoid clutter—focus on one key element.
- Use bold fonts and colors that stand out in YouTube’s grid view.
Creating professional thumbnails can significantly improve your video’s click-through rate and overall performance!
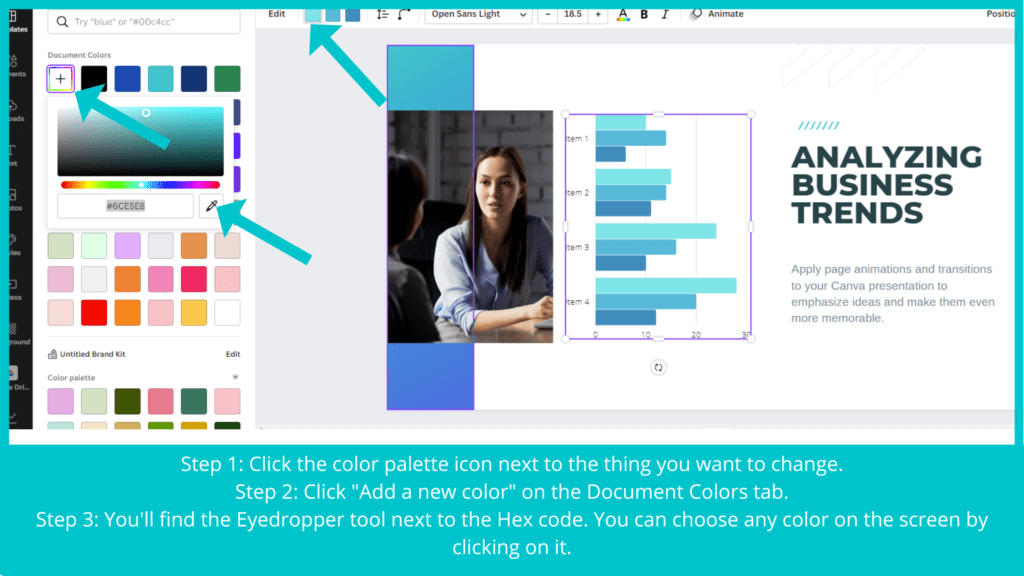
Tip 29: Using the Color Picker (Eyedropper Tool) in Canva
The Color Picker or Eyedropper Tool in Canva helps you accurately match and apply colors from any image or design element, ensuring seamless design harmony.
Steps to Use the Color Picker in Canva:
- Access the Color Palette:
- Click on the element whose color you want to change.
- Select the color palette icon from the top menu bar.
- Add a New Color:
- In the Document Colors tab, click on “Add a new color.”
- Use the Eyedropper Tool:
- Locate the Eyedropper icon (next to the Hex code field).
- Click on it, then hover over any color on your screen.
- Select the desired color by clicking on it.
- Apply the Color:
- The chosen color will now be applied to the selected element.
Benefits of the Color Picker:
- Brand Consistency: Extract and reuse brand colors for cohesive designs.
- Inspiration from Images: Pick colors directly from photos or graphics to enhance visual appeal.
- Custom Palettes: Save your chosen colors to create personalized palettes for future use.
Pro Tips:
- Pair colors strategically by using Canva’s color harmony suggestions to ensure complementary designs.
- Use the tool to maintain color consistency across multiple elements, making your designs more professional and polished.
4o
Humanize 203 words
Tip 30: Mastering Color and Font Combinations in Canva
Creating visually captivating designs relies on the perfect blend of color and font combinations. Canva provides tools to simplify this process while enhancing your design’s aesthetic.
1. Color Combinations with Canva:
Finding the Right Palette:
- Navigate to Canva’s Color Palettes tool.
- Search by entering a keyword (e.g., “warm,” “cool,” or “vibrant”).
- Browse through a variety of pre-made palettes.
Using the Color Wheel Generator:
- Access Canva’s Color Wheel Generator to create custom palettes.
- Adjust the wheel to explore analogous, complementary, triadic, and tetradic color schemes.
- Apply Hex codes or specific hues for precise matching.
2. Font Combinations in Canva:
Pre-made Combinations:
- Canva suggests font pairings to maintain visual harmony.
- Example: Pair bold headers with simple, readable body fonts.
Experiment with Font Hierarchy:
- Use distinct fonts for headings, subheadings, and body text to ensure clarity.
Custom Fonts and Colors:
- Combine brand colors with your chosen fonts to create cohesive branding.
- Adjust font weight, size, and spacing to match the design’s tone.
Pro Tips:
- Contrast: Pair dark fonts with light backgrounds and vice versa for readability.
- Branding: Stick to 2–3 fonts and colors to maintain consistency.
- Mood Alignment: Choose fonts and colors that convey the mood of your project (e.g., playful, professional, or elegant).
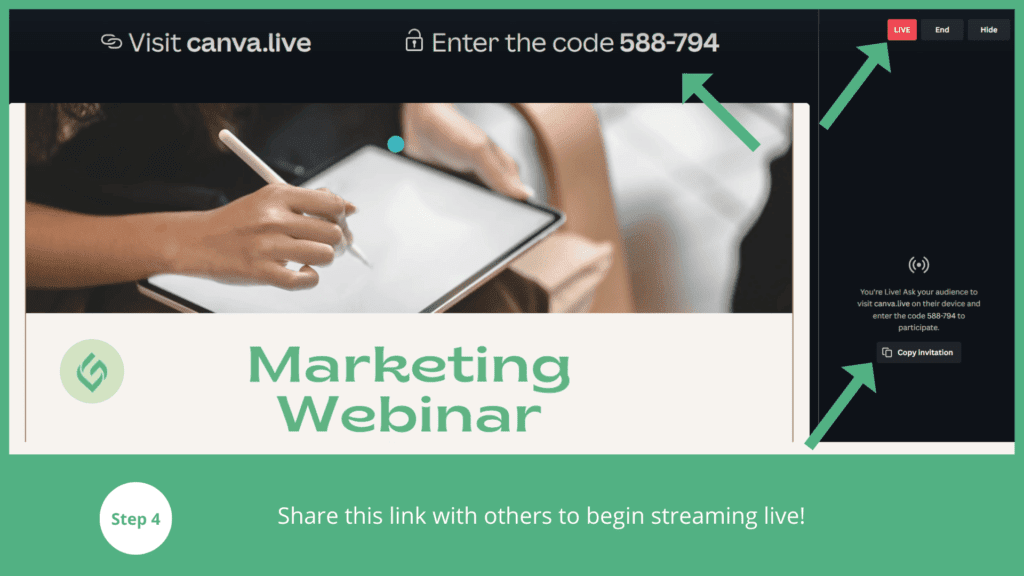
Tip 31: Livestream Through Canva
Canva offers a simple and interactive way to livestream presentations, perfect for educators, professionals, and content creators. This feature is available exclusively to Canva Pro users.
Steps to Start a Livestream in Canva:
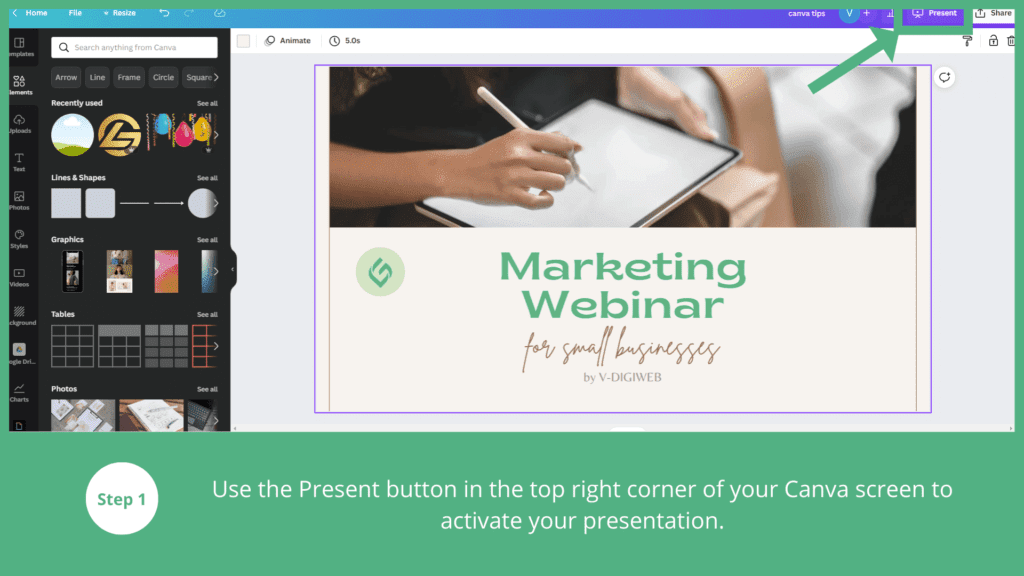
Step 1: Start Your Presentation
- Open your design in Canva.
- Click the Present button located in the top-right corner of your screen.
- If not visible, click on the … (More) button to find it.
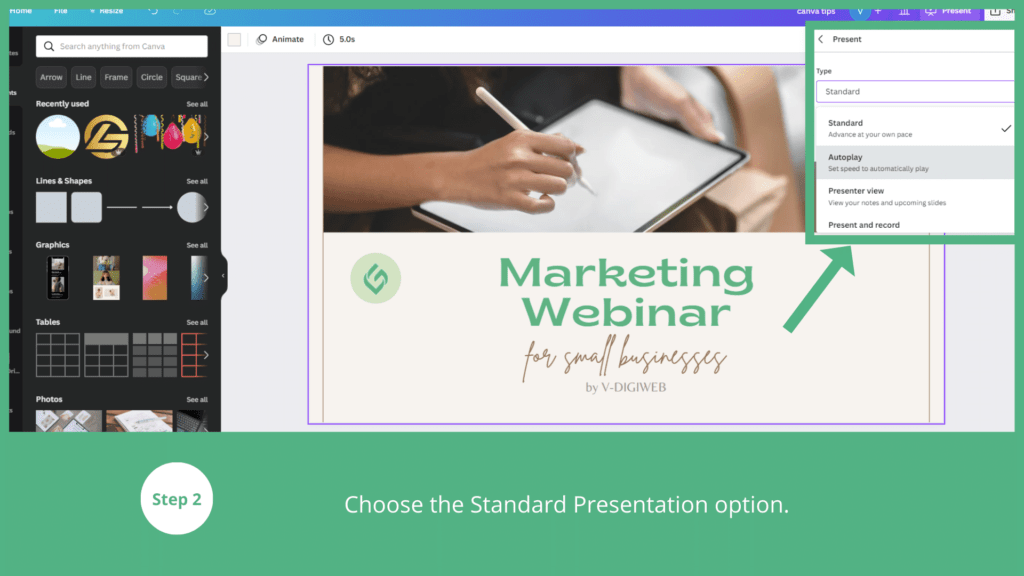
Step 2: Select Presentation Type
- Choose the Standard Presentation option to begin.
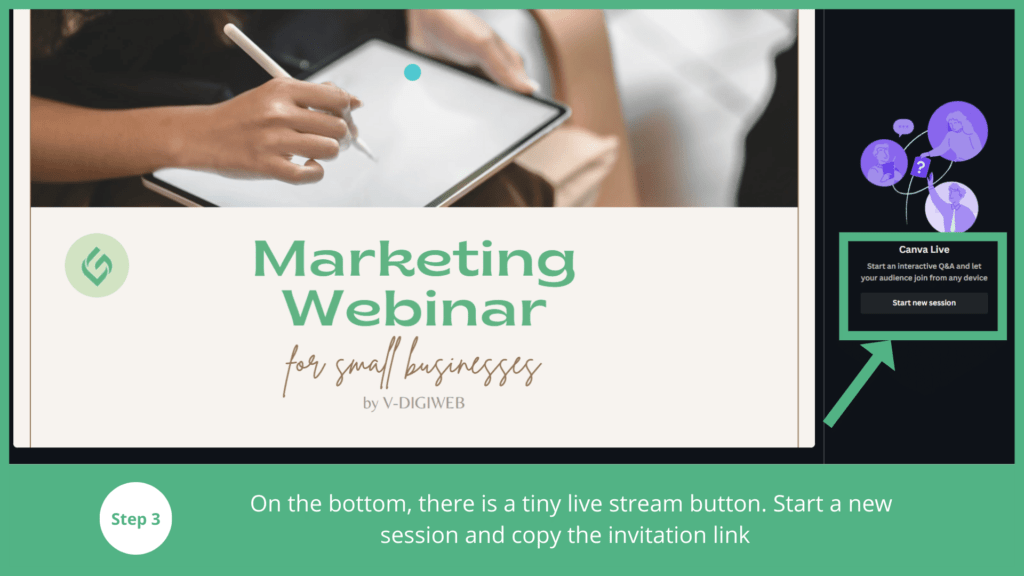
Step 3: Activate Livestream Mode
- At the bottom of the presentation, locate the livestream button (a small icon).
- Start a new session and generate an invitation link.
Step 4: Share the Link
- Copy the link and share it with your audience.
- Your viewers can join the stream without needing to download an app or create an account.
Key Features of Canva Livestream:
- Real-Time Interaction: Viewers can ask questions directly through their browser.
- No Downloads Required: Participants can join seamlessly via their browser.
- Perfect for Educators: Utilize Canva’s webinar and Q&A features for online classes and discussions.
Pro Tip:
- Test your presentation and stream settings before going live to ensure a smooth experience for your audience.
- Use Canva’s branding tools to maintain consistency in your presentation design.
By leveraging Canva’s livestreaming capabilities, you can deliver polished and engaging presentations effortlessly!
Tip 32: Add Motion to Your Design
Animating your Canva designs can make them more dynamic and visually engaging. Whether you’re creating a presentation, social media post, or video, adding motion can help capture your audience’s attention.
Steps to Add Motion to Your Canva Design:
Step 1: Open Your Design
- Start by opening your design in Canva.
Step 2: Group Elements for Coordinated Movement
- Select multiple elements and group them to apply a unified animation.
- Use the Ctrl + G (Windows) or Cmd + G (Mac) shortcut to group them.
Step 3: Animate Your Design
- Click on the Animate button in the top toolbar.
- Choose an animation style from the available options (e.g., fade, pan, rise, tumble).
Step 4: Add Animated Elements
- Go to the Elements tab and search for animated stickers, icons, or illustrations to include in your design.
Step 5: Incorporate Video
- Drag and drop a video from the Uploads tab or Canva’s video library into your design.
Step 6: Adjust Video Timing
- Select the video element and click on Edit to trim its start and end times as needed.
Step 7: Publish Your Animated Design
- Click the Share or Download button.
- Choose the MP4 or GIF format for motion-enabled files.
Pro Tip:
- Combine animation effects for individual elements and overall page transitions for a layered and professional look.
- Use Canva’s timing settings to control the duration of animations and video clips.
By adding motion to your designs, you can create eye-catching visuals perfect for presentations, advertisements, or social media content.
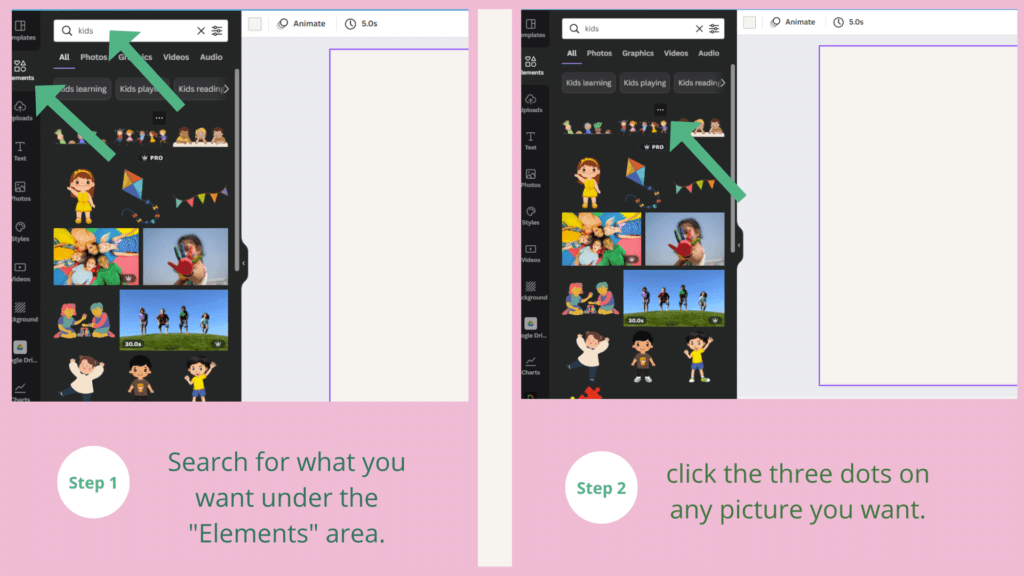
Tip 33: Search for Brand Codes in Canva
Canva allows you to explore and use assets consistently across designs by identifying and leveraging brand-specific codes. This feature helps maintain a cohesive look, especially when working with designs that incorporate brand elements.
Steps to Search for Brand Codes in Canva:
Step 1: Search in the “Elements” Tab
- Go to the Elements section in Canva.
- Type a keyword or phrase related to the element you’re looking for (e.g., “logo,” “brand,” or “design style”).
Step 2: Select an Image or Element
- Click on an image, icon, or element that fits your design needs.
Step 3: Access Additional Options
- Click on the three dots (…) located at the top-right corner of the selected element.
Step 4: Explore “More by Brand”
- From the dropdown menu, select More by Brand to view other elements or designs related to the selected brand or designer.
Step 5: Discover Similar Options
- Browse through the curated collection to find similar styles, themes, or assets that align with your design vision.
Pro Tip:
- Use this feature to stay consistent in branding by using elements from the same designer or brand.
- If you’re working on a project for a specific company, searching for elements from their branding ensures adherence to their design standards.
This feature is a time-saver when you want to maintain a unified aesthetic across all your designs!

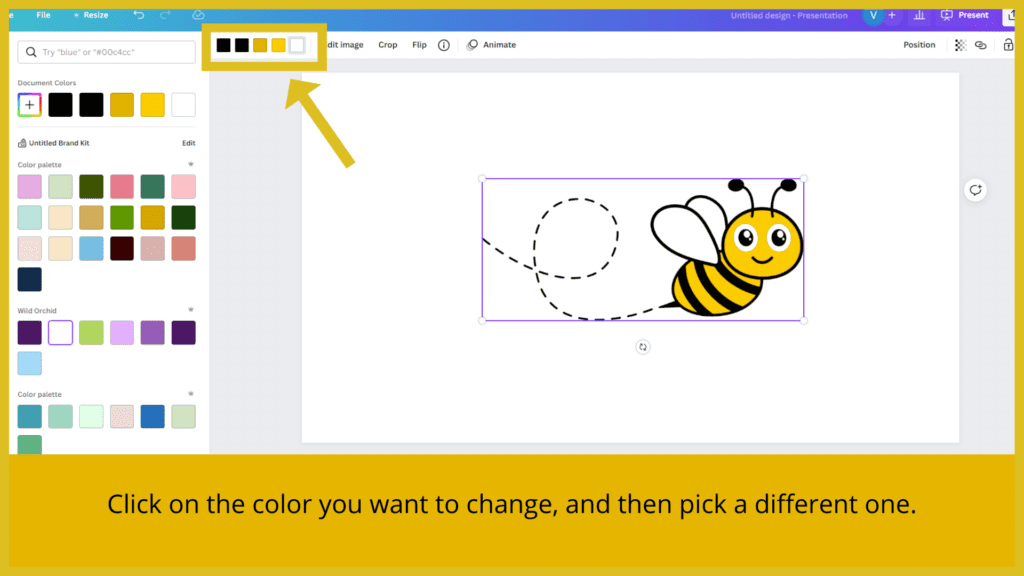
Tip 34: Customize Colors of Vector Artwork in Canva
Canva makes it simple to modify the colors of vector elements, allowing you to create designs tailored to your specific branding or creative needs.
Steps to Customize Vector Artwork Colors in Canva:
Step 1: Search for Vector Elements
- Navigate to the Elements tab in Canva.
- Enter keywords (e.g., “vector icons,” “illustrations”) to find a suitable vector element for your design.
Step 2: Add the Vector Element to Your Design
- Click on your chosen vector artwork to add it to your Canva editor.
Step 3: Access the Color Palette
- Once the vector element is selected, the header bar will display the colors used in the artwork.
- Each color in the design will appear as a separate swatch.
Step 4: Change the Colors
- Click on any color swatch to open the color picker.
- Choose a new color from the palette, input a specific hex code, or use the eyedropper tool to pick a color from your design.
Step 5: Repeat for Other Colors
- If the vector artwork contains multiple colors, repeat the process for each swatch until your design matches your desired palette.
Pro Tips:
- Brand Consistency: Use your Brand Kit colors (if available) to maintain consistent branding across all designs.
- Experiment with Gradients: Some vector elements allow gradient fills, adding depth and a modern touch to your designs.
- Test for Contrast: Ensure text or other design elements placed on the artwork remain readable by testing for sufficient contrast.
Customizing vector artwork colors ensures your designs feel unique and aligned with your project’s aesthetic.
Tip 35: Create Clickable Hyperlinks in PDFs with Canva
Clickable hyperlinks in PDFs can make your designs interactive and more professional, particularly for presentations, brochures, or portfolios. Here’s how to add them using Canva:
Steps to Add Clickable Hyperlinks in Canva PDFs:
Step 1: Select the Text or Element
- Highlight the text or select the element (e.g., button, icon) where you want to add the hyperlink.
Step 2: Open the Link Option
- Click the link icon (chain symbol) in the top-right toolbar of the Canva editor.
Step 3: Enter the URL
- Type or paste the URL of the website you want the link to direct to.
Step 4: Export as PDF
- After adding all desired links, go to the Share menu, click Download, and choose PDF Standard or PDF Print as the file format.
Important Notes:
- Hyperlink Compatibility: Links are functional only in PDF formats. They won’t work in image files like JPG or PNG.
- Interactive Designs: Use clickable links to make digital brochures, portfolios, and presentations more engaging.
- Check Links Before Exporting: Ensure all URLs are correct and functional to avoid broken links in your PDF.
Adding hyperlinks makes your designs practical for sharing information seamlessly with your audience!


Tip 36: Creating Animated Videos for Canva Tips and Tricks
Canva’s free animated video creator lets you craft professional-looking animated videos in just minutes. With a user-friendly editor and a vast library of video templates, you can easily create animations for tutorials, projects, or promotional content.
Steps to Create Animated Videos in Canva:
Step 1: Start Your Project
- Open Canva and search for “Video” or “Video Collage” in the search bar.
- Choose a video template or start with a blank canvas.
Step 2: Customize the Template
- Personalize the text, colors, and fonts to suit your theme.
- Add your own media, such as photos, clips, and logos, or browse Canva’s design library for stock images, videos, icons, and vectors.
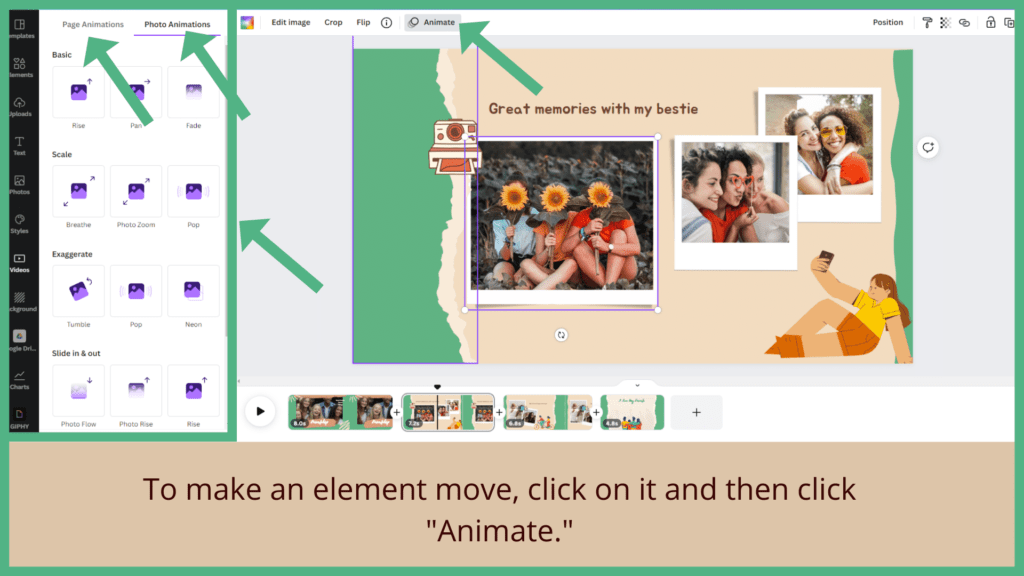
Step 3: Add Animations
- Select “Animate” from the top toolbar to bring your design to life.
- Choose animations for:
- Pages: Apply animation to the entire page.
- Elements: Make specific objects like text or icons move.
- Use the clock icon on the toolbar to adjust the animation’s duration.
Step 4: Preview and Edit
- Play your video to see how the animations look together.
- Fine-tune the timing, transitions, and any other details to ensure smooth playback.
Step 5: Share or Export Your Video
- Share the animated video directly via email or social media.
- Download it as a high-quality MP4 file for offline use.
Why Use Animated Videos for Canva Tips and Tricks?
- Engage Your Audience: Animated videos are visually captivating and keep viewers interested.
- Educational Value: Simplify complex tips with dynamic visuals.
- Professional Presentation: Use animations to create polished tutorials or promotional content.
Start exploring Canva’s animated video creator and elevate your content to the next level!
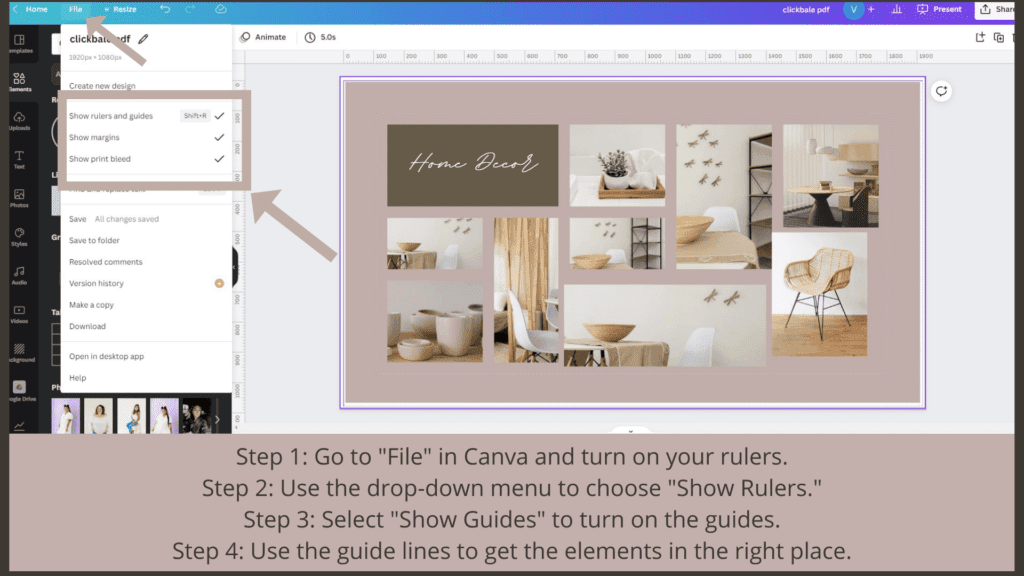
Tip 37: Align Text and Elements Perfectly Using Rulers in Canva
Getting text, graphics, and design elements aligned precisely can be challenging, but Canva’s Rulers and Guides feature makes this process seamless. These tools help ensure your designs are balanced and elements are consistently positioned across pages.
Steps to Use Rulers and Guides in Canva:
Step 1: Enable Rulers
- Go to the “File” menu in the top-left corner of Canva’s editor.
- Click “Show Rulers” to activate horizontal and vertical rulers.
Step 2: Enable Guides
- From the same “File” menu, select “Show Guides” to make guide lines visible on your canvas.
Step 3: Adjust Elements with Rulers
- Drag elements around while observing the rulers to measure their alignment.
- Use the rulers to ensure all elements maintain consistent spacing and placement.
Step 4: Use Guides for Precision
- Drag lines from the rulers to create custom guides for your layout.
- Align text, images, and other elements to the guides for a polished look.
Benefits of Rulers and Guides in Canva:
- Precision: Ensures consistent alignment and spacing for professional designs.
- Efficiency: Saves time by providing visual references for placing elements.
- Versatility: Useful for creating posters, presentations, and multi-page documents.
By using rulers and guides, you can elevate the quality of your designs and create visually appealing layouts effortlessly!
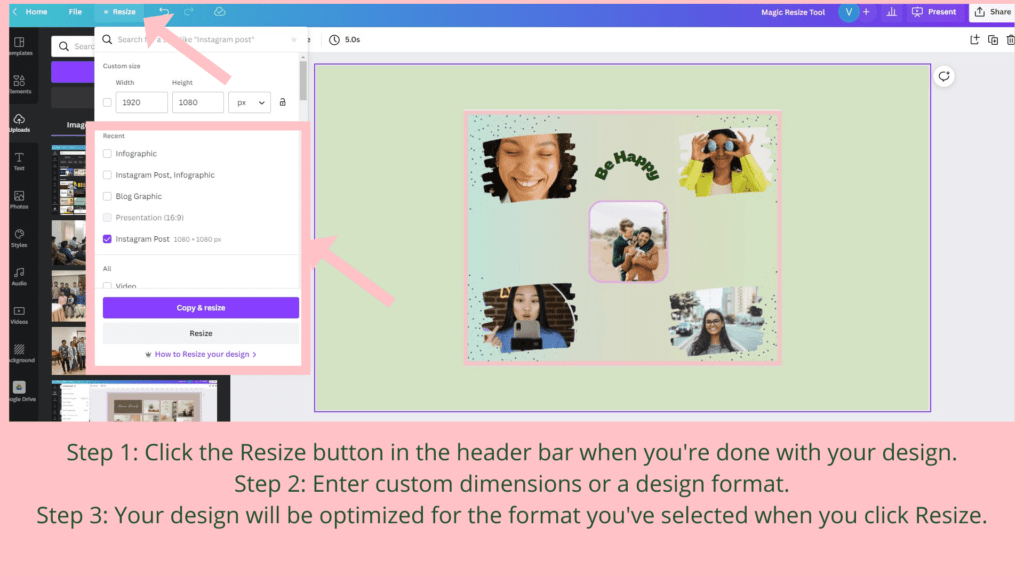
Tip 38: Save Time with Canva’s Magic Resize Tool
Resizing designs for various formats—like social media posts, flyers, web banners, or email headers—can be time-consuming. Canva’s Magic Resize Tool eliminates this hassle, allowing you to create one design and quickly adapt it to multiple dimensions.
Steps to Use Canva’s Magic Resize Tool:
Step 1: Complete Your Design
- Finalize your design in Canva’s editor.
Step 2: Access the Resize Option
- Click the “Resize” button located in the header bar at the top of the editor.
Step 3: Choose Dimensions or Formats
- Select a pre-defined format (e.g., Instagram Post, Facebook Cover, Flyer) or enter custom dimensions.
Step 4: Resize Your Design
- Click the “Resize” button to generate an optimized design for the chosen format.
Step 5: Save and Share
- Download or directly share your resized design to various platforms.
Benefits of the Magic Resize Tool:
- Efficiency: Resize designs in seconds, saving hours of manual work.
- Consistency: Maintain a cohesive look across different platforms.
- Versatility: Suitable for social media, print materials, ads, and more.
Use the Magic Resize Tool to streamline your design workflow and optimize your posts for maximum impact across platforms!
Tip 39: Create a Logo with Canva
Canva’s logo maker provides everything you need to design a customized logo quickly and easily, even for free.
Steps to Create a Logo in Canva:
Step 1: Open Canva
- Go to Canva’s homepage and type “Logo” into the search bar.
Step 2: Choose the Right Template
- Browse Canva’s extensive library of logo templates and pick one that fits your brand’s style and vision.
Step 3: Customize Colors
- Replace the default colors with your brand’s color palette to ensure a consistent identity.
Step 4: Adjust Fonts and Text
- Select a font that reflects your brand’s tone and style, then modify the text to include your business name and tagline (if applicable).
Pro Tips for Logo Design in Canva:
- Keep It Simple: Aim for a clean design that works across various formats and sizes.
- Use Vector Elements: Opt for scalable designs to maintain quality on any platform.
- Experiment with Fonts: Canva offers a wide range of fonts—mix and match until you find the perfect combination.
- Save in High Resolution: Export your logo in PNG format with a transparent background for professional use.
With Canva, creating a professional logo is both quick and straightforward. Let your brand stand out with a design that truly represents your identity!
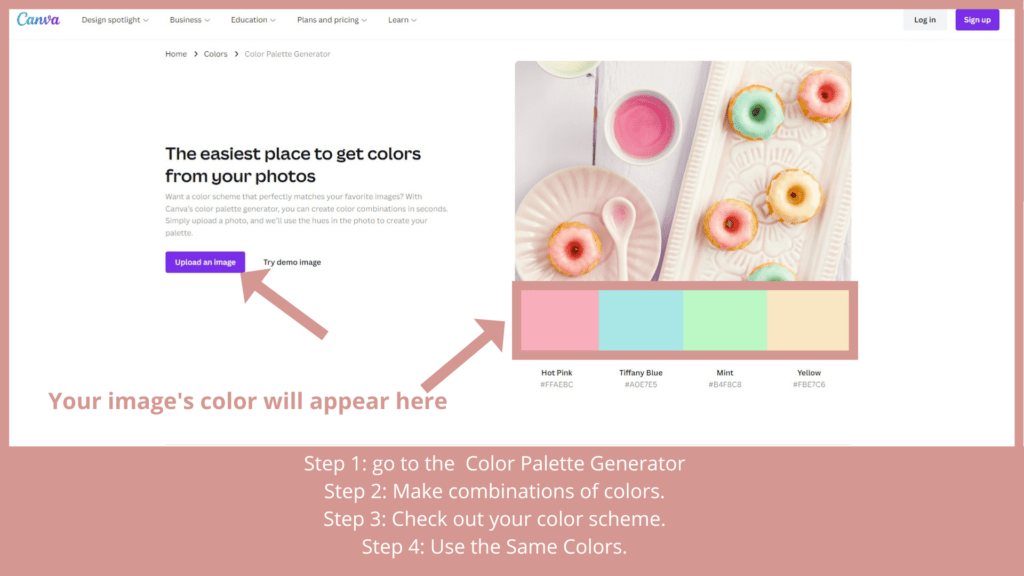
Tip 40: Canva’s Color Palette Generator
The Canva Color Palette Generator is a powerful tool that allows you to create appealing and harmonious color combinations with just a few simple clicks. It’s ideal for designers, marketers, and anyone looking to create cohesive color schemes for their projects.
Steps to Use the Canva Color Palette Generator:
Step 1: Visit the Color Palette Generator
- Go to Canva’s Color Palette Generator page to get started.
Step 2: Upload an Image or Choose from a Pre-Set Palette
- You can either upload your own image or explore Canva’s pre-set color combinations. Uploading an image allows you to extract colors directly from it.
Step 3: Create Color Combinations
- Experiment with different combinations of colors that best fit your design needs. Canva will generate matching colors based on the selected palette or image.
Step 4: Test Your Color Scheme
- Preview how your colors look together and adjust as needed to create a balanced and visually appealing scheme.
Step 5: Use the Colors
- Once you’re happy with your color palette, you can directly use it in your Canva designs. These colors can be applied to any project to maintain consistency across all your materials.
Pro Tips for Using the Color Palette Generator:
- Use Contrasting Colors: Combine light and dark colors for better contrast and readability.
- Stay on Brand: If you already have brand colors, upload an image of your logo or product to extract matching colors.
- Test Accessibility: Ensure your color palette is accessible for all users, especially those with color vision impairments, by using accessible color combinations.
This tool simplifies color selection and helps ensure that your designs are always vibrant, cohesive, and eye-catching.
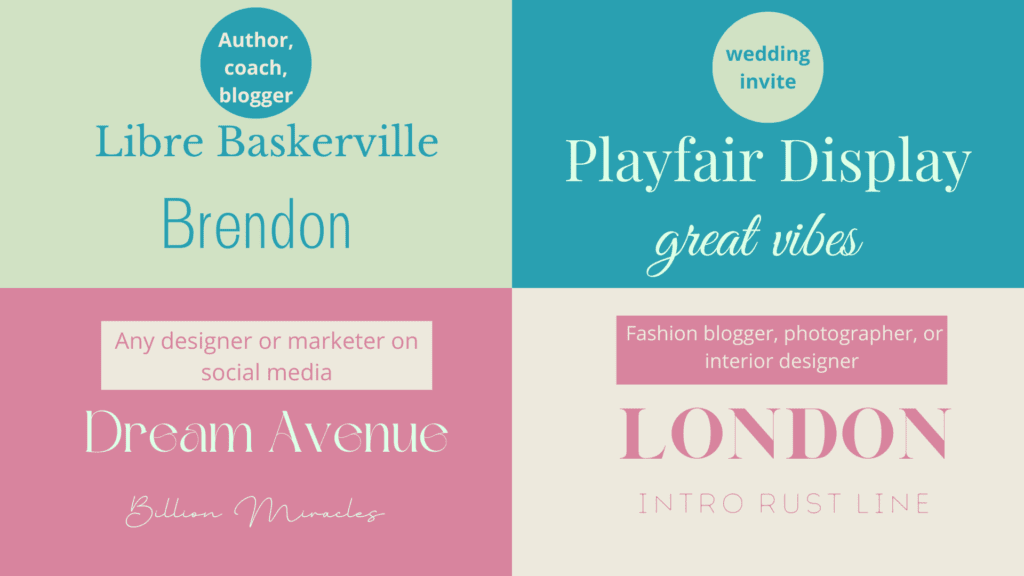
Tip 41: Canva Font Combos to Give Your Brand a New Look
Choosing the right font combinations is essential to make your brand stand out and convey your message effectively. Canva offers a wide range of fonts, and pairing them well can elevate your design. Below are some excellent font combinations tailored to specific purposes.
Recommended Font Combinations for Various Purposes:
1. Writer, Coach, Blogger
- Libre Baskerville + Brendon
This combination offers a classic, serif look (Libre Baskerville) paired with a modern, clean sans-serif (Brendon) for easy readability.
2. Wedding Invitations
- Playfair Display + Nice Vibes
Playfair Display gives an elegant, formal touch, while Nice Vibes adds a playful and modern feel to your design.
3. Designers or Social Media Marketers
- Dream Avenue + Billion Miracles
Dream Avenue provides a creative and stylish look, while Billion Miracles gives it a modern and fresh touch, making it perfect for social media visuals.
4. Fashion Blogger, Photographer, or Interior Designer
- London + Intro Rust Line
London, with its elegant serif font, blends beautifully with the modern sans-serif font Intro Rust Line, making it ideal for lifestyle and design-oriented brands.
5. Resume Design
- Oswald + Lato
A clean and professional combination, Oswald offers boldness, while Lato keeps things neat and legible, perfect for resumes.
6. Social Media Entrepreneurs
- Chloe + Jonathan
Chloe’s script style paired with the sleek Jonathan font gives a creative yet professional look, ideal for social media posts and entrepreneurial brands.
7. Photographers, Event Planners
- Abiah + Calgary
Abiah’s serif elegance combined with Calgary’s clean, minimalist font creates an upscale, sophisticated aesthetic, suitable for photographers and event planners.
8. Entrepreneurs
- Versailles + Be Vietnam Skinny
Versailles offers a bold, elegant flair, while Be Vietnam Skinny adds a modern and sleek feel, a great fit for entrepreneurs and business branding.
Tips for Pairing Fonts:
- Contrast is Key: Pair serif and sans-serif fonts to create a balanced contrast.
- Stick to 2-3 Fonts: Avoid using too many fonts to keep the design cohesive and clean.
- Match the Mood: Choose fonts that reflect the mood and tone of your brand or message (e.g., playful, professional, elegant).
- Consider Legibility: Make sure your fonts are easy to read, especially for digital platforms.
By using these combinations, you can refresh your brand’s look and ensure that your message is conveyed with style and clarity.

Tip 42: Making the Most of Pre-made Color and Font Schemes
If you’re feeling overwhelmed by color choices and font pairing, Canva’s Styles tab can be a game-changer! It allows you to quickly apply professional and aesthetically pleasing color palettes and font combinations with just one click. This feature can save you time and help ensure that your design looks cohesive and polished.
How to Use Canva’s Styles Tab:
Step 1: Open your design in Canva.
Step 2: On the left sidebar, click on the “Styles” tab.
Step 3: Explore the pre-made color palettes and font combinations. Canva offers a variety of options suited for different types of designs—whether you’re working on a social media post, flyer, or presentation.
Step 4: Select a Color Palette:
- Simply click on a color palette you like, and it will be applied to your design. Canva will automatically adjust your elements to match the colors in the palette.
Step 5: Choose a Font Pairing:
- If you’re unsure which fonts go well together, Canva provides curated font pairs that can be applied with a single click. This saves you the trouble of figuring out which fonts complement each other.
Benefits of Using Canva’s Styles Tab:
- Time-Saver: Skip the manual work of selecting colors and fonts; the hard work is already done for you.
- Consistency: Ensure your design stays cohesive and on-brand with pre-selected color schemes and font pairings.
- Ease of Use: Perfect for beginners or those in need of inspiration, making professional designs accessible to all.
With this feature, you can take your designs to the next level quickly and with confidence, knowing that you’re using color and font combinations that work well together!

Tip 43: Using Canva Content Planner to Create and Schedule Social Media Posts
Canva’s Content Planner is a powerful tool that helps individuals, small businesses, and enterprises manage their social media content efficiently. It enables users to plan, create, publish, and track the performance of their social media posts—all in one place.
How to Use Canva Content Planner:
Step 1: Open the Content Planner by clicking on the “Content Planner” tab on the left sidebar of your Canva dashboard.
Step 2: After clicking on it, you’ll be directed to the Content Planner dashboard, where you can see a calendar view of your scheduled posts.
Step 3: To schedule a new post, click on the “+” button next to the date you want to schedule the post.
Step 4: A pop-up will appear asking if you want to create a new design or add an existing design. Choose the appropriate option:
- Create a new design: Select this if you want to design a new post from scratch or use one of Canva’s templates.
- Add an existing design: If you already have a design saved in your Canva account, you can upload it here.
Step 5: Once your post is created or selected, you can schedule it by setting the time and date when you want it to be published on your chosen social media platform.
Benefits of Using Canva’s Content Planner:
- Save Time: Plan and schedule all your social media posts in advance, so you don’t have to worry about posting manually each day.
- Consistency: Ensure consistent posting by having a clear view of your content calendar and staying on track.
- Easy Management: Manage multiple social media accounts and content types in one centralized location.
- Performance Tracking: Canva also lets you track the performance of your posts, giving you valuable insights into your social media strategy.
The Canva Content Planner is an ideal tool for anyone looking to streamline their social media content creation and scheduling process, making it easier to manage and stay consistent across platforms!

Tip 44: From the Home Webpage, You Can Search for Templates
Canva provides a wide variety of templates for different design needs, but sometimes you might need a specific format, like an Instagram story, which might not be readily visible. Here’s how you can easily find templates and resize them according to your needs:
How to Search for Templates from the Home Webpage:
Step 1: Go to the Canva home page.
Step 2: You’ll see a search bar at the top or you can scroll down to find popular templates categorized by type (e.g., social media posts, presentations, flyers).
Step 3: Use the search bar to type in the design format you’re looking for, such as “Instagram story,” “flyer,” “poster,” etc. You’ll be presented with many options.
Step 4: If the specific template format you need isn’t available, select a template you like from the search results.
Step 5: Resize the template to fit your required format using Canva’s resize tool if needed. You can adjust the dimensions to match the platform you’re creating for.
Why Use This Tip:
- Flexibility: Even if a template isn’t in the exact format you need, you can resize it to suit your project’s requirements.
- Efficiency: Quickly find templates tailored to your specific design type, whether it’s a social media post, presentation, or flyer, saving you time.
- Customization: Once you find a template, you can easily modify it with your brand colors, images, and text.
This tip ensures that you never have to worry about finding a template in the wrong size or format again!

Tip 45: Record Your PC Screen with Canva (Free)
Canva offers a built-in screen recorder, which is a great tool for creating tutorials, presentations, or demonstrations. Whether you’re a student, teacher, or professional, this feature can help you capture and share your screen activity.
How to Record Your PC Screen with Canva:
Step 1: Select Your Document Type (Video)
- Go to the Canva homepage and create a new design.
- Choose a Video template, as it’s best suited for screen recording.
Step 2: Click on the “Record Yourself” Button
- Once your video design is open, look for the “Record Yourself” button on the toolbar.
Step 3: Adjust Camera and Microphone Settings
- Before starting your recording, make sure to adjust your camera and microphone settings as needed.
- Select whether you want to record the screen only, include yourself in the video (with webcam), or use both.
Step 4: Start Recording
- After you’ve configured the settings, hit the record button to begin capturing your screen.
- You can present or demonstrate anything on your screen, and Canva will record it for you.
Why Use This Tip:
- Free Tool: This screen recorder is available for free on Canva, making it an accessible option for all users.
- Versatile: Perfect for educational content, business presentations, and personal tutorials.
- No Extra Software Needed: You don’t need to download any third-party apps—Canva’s built-in recorder does it all.
This feature saves time and simplifies the process of creating and sharing screen recordings, making it perfect for online classes or business presentations.
![RECORD your Pc SCREEN with Canva [FREE]](https://v-digiweb.com/wp-content/uploads/2022/06/screen-recording-1024x482.jpg)
Examine further: canva affiliate program
Conclusion:
Canva has truly revolutionized the way you design, create, and market assets for your business. By leveraging its user-friendly platform, you can effortlessly create stunning visuals for everything from social media posts to presentations, marketing materials, and more.
However, to maximize your productivity and creativity, it’s essential to familiarize yourself with Canva’s various features and tools. Whether it’s through using templates, color palettes, fonts, animations, or its built-in screen recorder, Canva offers an array of options that make the design process quicker, more efficient, and more professional.
By mastering Canva’s platform, you give yourself the opportunity to not only save time but also enhance your brand’s visuals and messaging, driving better engagement with your audience. The possibilities are endless when you fully embrace all the amazing features Canva has to offer!